- Here we are removing the virus through the command prompt.
- Normally when a virus infects a windows system which causes a drive opening problem, it automatically creates a file named autorun.inf in the root directory of each drive.
- This autorun.inf file is a read only ,hidden and a system file and the folder option is also disabled by the virus.
- This is deliberately done by the virus in order to protect itself. autorun.inf initiates all the activities that the virus performs when you try to open any drive.
- Start –> type Run –> type cmd -click on OK button

- Right click –> run as Administrator this window opens up.

- Select the drive (which is infected drive).

- here p is the usb drive we type p: and press the enter key
- type attrib -r -h -s press enter (This command removes the Hidden, Read Only, System and Archive attributes over any file)
please note the spacing: no space between the dash and the letter & a space after the r h and s - Restart your system and your trouble will be fixed.
- if there’s an autorun.inf file rename it
(rename filename.extension newfilename). - Delete the harmful files
*you can also delete the harmful files using command prompt
( type del filename). - How to remove short cut virus

- Type in Command prompt : attrib -h -r -s /s /d <Your USB drive letter>:\*.*
- (See <Your USB drive letter> from My computer and then type it For ex, if your drive letter is “J” then the command is like: ” attrib -h -r -s /s /d J:\*.* “
- press enter.’
- Now your Shortcut files again convert to normal files. Delete unknown files from your storage aftercommand process completes.

- Now your Shortcut files again convert to normal files. Delete unknown files from your storage aftercommand process completes.
- removing shortcut virus copy your USB data to your computer
- Format the USB storage
- Then Reagan the data copy.
Wired and wireless network problems
-
A wireless network adapter switch that’s not enabled
-
WEP, WPA, or WPA2 security key or passphrase issues
-
Cables that aren’t connected properly
-
Corrupted or incompatible drivers
-
Missing updates
-
Network connection settings
-
Hardware or software problems.
-
Check hardware in Windows XP
-
Many network connection problems are caused by hardware that isn’t set up properly. Here’s some information about how to check your cables, check or reset your modem, and check for problems with your network adapter.
-
For a list of compatible hardware, visit the Compatibility Center:
-
The Latest Windows XP Hardware Compatibility List
-
Check the wireless switch (wireless networks only)
-
If you’re using a laptop, make sure that the network adapter switch on your laptop is turned on. Many laptops have a physical switch somewhere on the top, front, or side of the laptop that turns the network adapter on or off. There’s usually an indicator light on the laptop that shows if the wireless network adapter is enabled.
-
Make sure all cables are connected properly Loose or disconnected Ethernet cables, DSL or cable connections, telephone cords, USB cables, or power cables can cause network or Internet connection issues. Check all of these connections to make sure they are properly connected. This section mainly applies to wired networks, but if you’re trying to connect wirelessly to your own home wireless network, you should check the modem and cabling to the modem as described below.
-
To check DSL Internet connections
-
Check the phone line that runs from your phone jack to the phone line port on the DSL modem.
-
Make sure there’s no DSL filter between the phone jack and the modem.
-
Check the Ethernet cable that runs from the Internet connection on the DSL modem to the network adapter on your computer.
-
Make sure the DSL modem is plugged into a power outlet and the power to the modem is turned on.
-
To avoid dropped Internet connections, make sure all telephones that are connected to the same line as the DSL modem are connected to a DSL telephone phone line filter.
-
To check cable Internet connections
-
Check the coaxial cable that runs from the wall to your cable modem.
-
Check the Ethernet cable that runs from the cable modem to the network adapter on your computer.
-
Make sure that the modem is plugged into a power outlet and the power to the modem is turned on.
-
To check dial-up Internet connections
-
Check the telephone line that runs from your telephone jack to the telephone port on your computer’s modem to make sure the connections are good and the phone line isn’t damaged.
-
Verify that you’re calling the correct number, including any required access numbers (such as 9), and that the number isn’t busy.
-
Make sure call waiting is disabled on your telephone line when you connect to the Internet, so that incoming calls don’t disconnect the Internet connection.
-
Most dial-up modems only work with analog phone lines. Verify that you have analog phone lines installed, or, if you have digital phone lines installed, verify that your computer has a digital modem.
-
To check USB network adapters
-
If the cable that connects an external modem to your computer is a USB cable, you must perform some additional checks. A USB cable has different connectors on each end. One end is flat and rectangular, and the other end has a square connector with angles on two of the corners. To check a USB connection, follow these steps:
-
If the modem is attached to the computer by using a USB hub, try to bypass the USB hub by plugging the cable from the modem directly into one of the USB ports on your computer.
-
If the modem is plugged into one of the ports on the front of a desktop computer, try plugging the USB cable into one of the ports on the back of the computer instead. Some computers don’t provide sufficient power to the front USB ports. This can create problems with the connection to the modem.
-
Check the indicator lights on your modem
-
Check the indicator lights on your modem or Internet connection device (this can be either a modem, a modem and a wireless router, or a combined router-modem device). Most of these devices have an indicator light that is labeled “Broadband link,” “Internet,” “Online,” or something similar that indicates a connection to the Internet. If you’re unsure, refer to the documentation that came with the device.
-
Reset the modem
-
In some instances, the IP settings or network configuration that you receive from your Internet service provider (ISP) might be incorrect or need updating. Sometimes, the connection between the modem and the ISP might experience problems. To update the settings on the modem or the router, reset (restart) the modem. This creates a fresh connection to the ISP. Use one of the following methods to reset the modem, following the steps for your modem type.
-
To reset an external modem
-
Disconnect the cable that connects your computer or router to the modem. This can be either a USB cable or an Ethernet cable.
-
Turn off the modem using the power switch on the front or back of the modem. If the modem doesn’t have a power switch, disconnect the power cord from the back of the modem, or unplug it from the wall.
-
Wait several minutes, and then turn on the modem and reconnect the cable from the computer or the router to the modem.
-
Restart the computer.
-
Test your connection to see whether you can access the Internet.
-
To reset an internal modem
-
Restart the computer.
-
Use Device Manager
-
Use Device Manager to verify that your network adapter is working correctly:
-
You must be logged on as an administrator to perform these steps.
-
Check the network adapter
-
Click Start, right-click My Computer, and then click Properties.
-
Click the Hardware tab, and then click Device Manager.
-
Double-click Network Adapters, and then right-click your network adapter.
-
Click Properties, and then, under Device status, check to see that the device is working properly.
-
if the network adapter is disabled, click Enable Device to enable it.
-
If the network adapter isn’t working properly, you might need to download and install the latest driver for it. (If you received an installation disc with the network adapter or with your computer, the driver might also be on the disc.) .
-
If you’re still having problems finding the latest driver for your hardware, go to the “To download and install a driver yourself”.
-
How to manage devices in Windows XP .
-
Make sure the correct network adapter is being used.
-
Some computers might have multiple network adapters. For example, if you bought a new desktop computer and during the purchase you upgraded to a different network adapter, you most likely have an onboard network adapter (a network adapter built onto your computer’s motherboard) as well as a secondary network adapter inserted into an available slot in the computer. You can verify this by looking for two network ports on the back of your computer. (Network ports look like large phone jacks.) Laptops normally have just one network port unless you’re using a USB network adapter.
-
To set the default network adapter
-
Click Start, click Control Panel, click Network and Internet Connections, and then click Network Connections.
-
If multiple network adapters are installed, the default adapter will have a check mark and be labeled “Default.”
-
If the correct network adapter is listed as disabled, right-click it, and then click Enable.
-
If the wrong network adapter is listed as the default device, right-click the correct device, and then click Set Default.
-
Close the networking window, and then test for a network connection.
-
Update drivers in Windows XP
-
A network adapter driver is software used by your computer to communicate with your wireless network adapter. Outdated, incompatible, or corrupted network adapter drivers can prevent network connections or cause intermittent disconnections.
-
If you recently upgraded from one Windows operating system to another, it’s possible that the current network adapter driver was designed for the previous Windows operating system. If you’ve had recent power outages, viruses, or other computer problems, it’s possible that the driver has become corrupted. Downloading and installing the latest network adapter driver can resolve these types of problems.
-
Here are three ways to find and install a driver:
-
Use Windows Update. You might need to set Windows Update to automatically download and install recommended updates. Installing any important, recommended, and optional updates can update system features and other software that might help to fix your network connection problems.
-
Install software from the device manufacturer. For example, if your computer or network adapter came with a disc, that disc might contain software that installs a driver for the network adapter.
-
Download and install the driver yourself. You can search for a driver on the manufacturer’s website. Try this if Windows Update can’t find a driver for your network adapter and the adapter didn’t come with software that installs a driver.
-
Connect to a wireless network in Windows 7
-
If you have a laptop or a PC with a wireless network adapter, you can see a list of available wireless networks and then connect to one of those networks. The wireless networks will only appear if your PC has a wireless network adapter installed, the adapter is turned on, and the wireless access point is in range.
-
Click the wireless network icon
 in the notification area.
 -
In the list of wireless networks, click the network you want to connect to, and then click Connect.
-
If you’re connecting to a secure network, type the security key, and then click OK.
-
-
Connect to a wireless network using Wi–Fi Protected Setup
If you’re using Windows 7 or Windows Vista Service Pack 2 and your router supports Wi–Fi Protected Setup (WPS) or Windows Connect Now (WCN), you can add a PC to the network by following these steps:
-
Click the wireless network icon
 in the notification area of the taskbar.
 -
Click your network, and then click Connect.
-
Instead of typing a security key or passphrase, press the Wi–Fi Protected Setup (WPS) button on the router. The router will automatically set up the PC to connect to the network and apply the network’s security settings.
How to Logon In XP when Forget Your Password

- Restart the computer. In between the appearance of the BIOS POST screen and the Windows XP boot screen, alternate pressing Ctrl and F8.
- The Windows boot menu should appear. Select any “safe mode.”

- On the login screen, you should see “Administrator.”

- If you don’t, press Ctrl + Alt + Del twice and manually enter the “Administrator” in without at password.
- Once successfully logged in, go to the – > Control Panel –> User Accounts –> Pick an account to Change

- What do you Want to change about your account
- Change my password and remove my password.

- When You select Change my password then this window appear

- Change the new password and click on the Change Password.
- Logoff and Restart the computer .

- If you want the remove password then click –> Remove the Password . .

- Logoff and restart the computer . This will be Login Automatically.
Managing The System Configuration
-
Startup And Recovery Options
-
Start –> Computer-> Right click –>Properties
-
-
On the Left pane Click on Advanced System Settings Click On it
-
-

-
This displays the System Properties Dialog Box
-
On the Advanced Tab of the System properties Dialog box click Settings under Startup and Recovery
-

-
On a computer Which has multiple O.S. use the Default Operating System.
-
Selecting Time to Display list of Operating System Check Box and Specify a time out in Seconds. To speed up the process
-
Selecting Time to Display Recovery options Check Box and Specify a time out in Seconds.
-
click OK to save settings.
-
System Configuration
-
System Configuration is a tool that can help identify problems that might prevent Windows from starting correctly.
-
System Configuration is intended to find and isolate problems, but it’s not meant as a startup management program.
-
Start –> Run-> Msconfig.exe and click –> OK

- This window will be Appear
-
-
-
-
ON the General Tab options
-
Normal startup. Starts Windows in the usual manner. Use this mode to start Windows after you’re done using the other two modes to troubleshoot the problem.
-
Diagnostic startup. Starts Windows with basic services and drivers only. This mode can help rule out basic Windows files as the problem.
-
Selective startup. Starts Windows with basic services and drivers and the other services and startup programs that you select.
-
After you can Restart your Computer and resolve any problems access the System Configuration Utility again
-
Select Normal Startup on the General Tab and Click OK.
-
-

-
ON the Boot Tab options
-
Safe boot:
-
Minimal. On startup, opens the Windows graphical user interface (Windows Explorer) in safe mode running only critical system services. Networking is disabled.
-
Alternate shell. On startup, opens the Windows command prompt in safe mode running only critical system services. Networking and the graphical user interface are disabled.
-
Active Directory repair. On startup, opens the Windows graphical user interface in safe mode running critical system services and Active Directory
-
Network. On startup, opens the Windows graphical user interface in safe mode running only critical system services. Networking is enabled.
-
No GUI boot. Does not display the Windows Welcome screen when starting.
-
Boot log. Stores all information from the startup process in the file %SystemRoot%Ntbtlog.txt.
-
Base video. On startup, opens the Windows graphical user interface in minimal VGA mode.
-
This loads standard VGA drivers instead of display drivers specific to the video hardware on the computer
-
OS boot information. Shows driver names as drivers are being loaded during the startup process.
-
Make all boot settings permanent. Doesn’t track changes made in System Configuration.
-
When this option is selected, you can’t roll back your changes by selecting Normal startup on the General tab.
-
ON the Advanced Boot Tab options
-
Clicking the Advanced Options buttons on the boot tab displays this Dialog box appears
-
Number of processors. Limits the number of processors used on a multiprocessor system. If the check box is selected, the system boots using only the number of processors in the drop-down list.
-
Maximum memory. Specifies the maximum amount of physical memory used by the operating system to simulate a low memory configuration. The value in the text box is megabytes (MB).
-
PCI Lock. Prevents Windows from reallocating I/O and IRQ resources on the PCI bus. The I/O and memory resources set by the BIOS are preserved.
-
Debug. Enables kernel-mode debugging for device driver development.
-
Global debug settings. Specifies the debugger connection settings on this computer for a kernel debugger to communicate with a debugger host. The debugger connection between the host and target computers can be Serial, IEEE 1394, or USB 2.0.
-
Debug port. Specifies using Serial as the connection type and the serial port. The default port is COM 1.
-
Baud rate. Specifies the baud rate to use when Debug port is selected and the debug connection type is Serial. This setting is optional. Valid values for baud are 9600, 19,200, 38,400, 57,600, and 115,200. The default baud rate is 115,200 bps.
-
Channel. Specifies using 1394 as the debug connection type and specifies the channel number to use. The value for channel must be a decimal integer between 0 and 62, inclusive, and must match the channel number used by the host computer. The channel specified does not depend on the physical 1394 port chosen on the adapter. The default value for channel is 0.
-
USB target name. Specifies a string value to use when the debug type is USB. This string can be any value.
-
ON the Services Tab options
-
Lists all of the services that start when the computer starts, along with their current status (Running or Stopped). Use the Services tab to enable or disable individual services at startup to troubleshoot which services might be contributing to startup problems.
-
Select Hide all Microsoft services to show only third-party applications in the services list.
-
Disable all Disabling services that normally run at startup might cause some programs to malfunction or result in system instability. Don’t disable services in this list unless you know they’re not essential to your computer’s operation.
-
Selecting Disable all won’t disable some secure Microsoft services required for the operating system to start.
-
ON the Startup Tab options
-
Lists applications that run when the computer starts up, along with the name of their publisher, the path to the executable file, and the location of the registry key or shortcut that causes the application to run.
-
-
Clear the check box for a startup item to disable it on your next startup.
-
If you suspect an application has been compromised, examine the Command column to review the path to the executable file.
-
Disabling applications that normally run at startup might result in related applications starting more slowly or not running as expected.
-
ON the Tools Tab options
-
Provides a convenient list of diagnostic tools and other advanced tools that you can run.
-
Disk Management In Windows 7
- Disk Management is a system utility for managing hard disks and the volumes or partitions that they contain With Disk Management,
- you can initialize disks, create volumes, and format volumes with the FAT, FAT32, or NTFS file systems.
- On GUID partition table (GPT) disks, you can create up to 128 primary partitions. Because GPT disks do not limit you to four partitions, you do not need to create extended partitions or logical drives.
- Always use basic volumes, instead of dynamic volumes, on computers running MS-DOS, Windows 95, Windows 98, Windows ME Edition, Windows NT 4.0, or Windows XP Home Edition that are configured to dual-boot with Windows XP Professional or Windows Server 2003 operating systems.
- Click –> start –> Computer –> Right click Manage –> Computer Management Window Open it.
- Click -> Disk Management .

- How to manage Disk Volumes;
- Disk Management allows you to change disks between various types and partition styles, some of the operations are irreversible (unless you reformat the drive).
- You should carefully consider the disk type and partition style that is most appropriate for your application.
- Master Boot Record (MBR) Can be converted in to GPT (GUID) Partition Table .if there are no volumes on it.
- MBR can be converted in to Dynamic but the disk may Become unbootable.
- GPT can be converted in to MBR if there are no volumes on it.
- GPT can be converted in to Dynamic but the disk may Become unbootable
- Dynamic can be converted in to MBR if there are no volumes on it.
- Basic Disk : Manage all the Partition on the Disk. All the disk are initially Basic disk.
- It is Supported By DOS And All Windows Versions.
- Primary Partitions : There Can be only four Partitions On any Hard Disk.
- In the case of MBR basic Disk first three Simple volumes are Created on Primary Partitions and fourth simple volume is Created as Extended partition ,Within the extended partition, you can create unlimited logical drives.

- Extended Partition : There can be only a single extended partition on Any Disk.but it can be divided in to the multiple Logical Drives. A non bootable Portion Of the Hard disk.

- Logical Partition : Partition Of a hard Disk that acts as a single unit .All logical Partition are contained in Extended Partition

- Simple partition creation
- :Start –> Computer -> Right Click –>Manage –> Click –> Computer Management .->Left pane –> Disk Management.
- Right Click the unallocated volume and Choose New Simple Volume.

- New Simple Volume Wizard open it.

- Click –>Next Specify Volume size Click Next

- Assign Drive Letter and Paths and Click –> Next

- Format the Partition and Click Next.
- How to Shrink a Volume :
- Start –> Computer -> Right Click –>Manage –> Click –> Computer Management .->Left pane –> Disk Management.
- Right Click the Volume and Choose Shrink volume .The shrink Dialog box Appear.

- Right Click on the unallocated Space and then click Next

- Assign Drive Letter and Path click Next

- Format the Partition and Click Next.

- completing the Wizard Click Finish.

- How to Extended a Volume :
- Start –> Computer -> Right Click –>Manage –> Click –> Computer Management .->Left pane –> Disk Management.

- Right Click the Volume and Choose Extend volume .The Extend Dialog box Appear.

- Click Next –> Extend Volume Wizard dialog Box open Click –>Finish

- Dynamic Disk: Dynamic disk introduced in Windows Server 2000 . Dynamic disk do not use a partition table to track all partitions but use a hidden database to track information about dynamic Partitions on the Disk.
- Dynamic disk also supported in Windows 7. You can create volumes such as spanned and striped volumes and can also create fault-tolerant such as mirrored volume and RAID5 volume.
- After the Conversion of a basic disk in to Dynamic disk all the existing partitions and logical partitions of the basic disk become simple volumes on the basic disk.
- Do not convert disks to dynamic that contain multiple installations of Windows 2000, Windows XP Professional, or the Windows Server 2003 family of operating systems. It is likely that you will no longer be able to start the second installation.
- After you convert a basic disk into a dynamic disk, you cannot change the dynamic volumes back to partitions. Instead, you must move or back up your data, delete all dynamic volumes on the disk and then convert the disk.
- Dynamic disks are not supported on portable computers, removable disks, detachable disks that use Universal Serial Bus (USB) or IEEE 1394 (also called FireWire) interfaces, or on disks connected to shared SCSI buses.
- To convert a Basic Disk In to Dynamic disk :
- Right click On the Basic disk Click convert to Dynamic Disk

- Boot and system partitions.You can convert a basic disk containing the boot partition (which contains the operating system) to a dynamic disk. After the disk is converted, the boot partition becomes a simple boot volume (after restarting the computer).
- Dynamic disks provide features that basic disks do not, such as the ability to create volumes that span multiple disks (spanned and striped volumes), and the ability to create fault tolerant volumes (mirrored and RAID-5 volumes). All volumes on dynamic disks are known as dynamic volumes.

- Windows 7 allows you to create different disk volumes on Dynamic Disks.
- Simple Volume
- Spanned Volume
- Mirrored Volume
- Striped Volume
- Striped Volume With parity
- Simple and Spanned volumes possible to shrink and Extend .
- Striped volume are fixed in size so only option to delete it and recreate it.
Managing The Registry
- System configuration information is stored centrally in a hierarchical database called the registry.
- You can use Registry Editor to add and edit registry keys and values, restore the registry from a backup or to default values, and to import or export keys for reference or backup.
- The registry is a hierarchical database that contains data that is critical for the operation of Windows and the applications and services that run on Windows. The data is structured in a tree format. Each node in the tree is called a key. Each key can contain both subkeys and data entries called values.
- Each key has a name consisting of one or more printable characters. Key names are not case sensitive. Key names cannot include the backslash character (\), but any other printable character can be used. Value names and data can include the backslash character.
- The name of each sub key is unique with respect to the key that is immediately above it in the hierarchy. Key names are not localized into other languages, although values may be.
- Incorrectly editing the registry may severely damage your system. Before making changes to the registry, you should back up any valued data on your computer.
- You must have appropriate permissions to make changes to a registry key. To maintain security when making changes to a registry key for which you need administrative credentials, log in as a member of the Users group and run Regedit as an administrator by right-clicking the Regedit icon, clicking Run as, and clicking an account in the local Administrators group. The Regedit icon does not appear by default from the Start menu. To access the icon, open the Windows or WINNT folder on your computer
- Start –> Run –> Regedit

- Click –>OK ,Registry Editor Opens It.

- Registry structure
- The registry is organized in a hierarchical structure of subtrees and their keys, subkeys, and entries.
- The contents of the registry for one computer may vary widely from that of another, depending on the devices, services, and programs installed on each computer.
- Keys can have subkeys and subkeys can, in turn, have subkeys. While most information in the registry is stored on disk and is considered permanent, some information, stored in volatile keys, is overwritten each time the operating system starts.
- Subtrees are the root, or primary divisions, of the registry.
- HKEY_CLASSES_ROOT :Contains information used by various OLE technologies and file-class association data. A particular key or value exists in HKEY_CLASSES_ROOT if a corresponding key or value exists in either HKEY_LOCAL_MACHINE\SOFTWARE\Classes or HKEY_CURRENT_USER\SOFTWARE\Classes. If a key or value exists in both places, the HKEY_CURRENT_USER version is the one that appears in HKEY_CLASSES_ROOT.
- HKEY_CURRENT_USER :Contains the user profile for the user who is currently logged on interactively (as opposed to remotely), including environment variables, desktop settings, network connections, printers, and program preferences. This subtree is an alias of the HKEY_USERS subtree and points to HKEY_USERS\security ID of current user.
- HKEY_LOCAL_MACHINE :Contains information about the local computer system, including hardware and operating system data such as bus type, system memory, device drivers, and startup control data.
- HKEY_USERS : Contains information about actively loaded user profiles and the default profile. This includes information that also appears in HKEY_CURRENT_USER. Users who are accessing a server remotely do not have profiles under this key on the server; their profiles are loaded into the registry of their own computers.
- HKEY_CURRENT_CONFIG :Contains information about the hardware profile used by the local computer system at startup. This information is used to configure settings such as the device drivers to load and the display resolution to use. This subtree is part of the HKEY_LOCAL_MACHINE subtree and points to HKEY_LOCAL_MACHINE\SYSTEM\CurrentControlSet\Hardware Profiles\Current.
- Each root key name begins with HKEY_ to indicate to software developers that this is a handle that a program can use. A handle is a value used to identify a resource so that a program can access it.

- Registry hives and files
- The term hive describes a body of keys, subkeys, and values that is rooted at the top of the registry hierarchy. A hive is backed by a single file and a .log file that are in the systemroot\System32\Config or the systemdrive\Documents and Settings\username folders.
- In the Windows Server 2003 family of operating systems, the location of user profile information for each user of a computer, including the Ntuser.dat and Ntuser.dat.log, may depend on whether the installation of the operating system was a fresh installation or whether it was installed as an upgrade from Windows NT or Windows 2000.
- In fresh installations, the Ntuser.dat and Ntuser.dat.log files are stored in the systemdrive\Documents and Settings\username folder. In installations that are upgrades from Windows NT or Windows 2000, the Ntuser.dat and Ntuser.dat.log files are stored in the systemroot\Profiles\username folder.

- By default, most hive files (DEFAULT, SAM, SECURITY, SOFTWARE, and SYSTEM) are stored in the systemroot\System32\Config folder.
- HKEY_LOCAL_MACHINE\SAM –>Sam and Sam.log
- HKEY_LOCAL_MACHINE\SECURITY –> Security and Security.log
- HKEY_LOCAL_MACHINE\SOFTWARE –> Software and Software.log
- HKEY_LOCAL_MACHINE\SYSTEM –> System and System.log
- HKEY_CURRENT_CONFIG –> System and System.log
- HKEY_CURRENT_USER –> Ntuser.dat and Ntuser.dat.log
- HKEY_USERS\.DEFAULT –>Default and Default.log
- Entries in the registry keys
- Each registry key or subkey can contain data called entries. Some entries store information that is specific to each user, while others store information that applies to all users of a computer. An entry has three parts: the name of the value, the data type of the value, and the value itself.
- Data types describe the format of the data. Data types from 0 through 0x7FFFFFFF are reserved for definition by the system. Programs are encouraged to use these data types, but data types from 0x80000000 through 0xFFFFFFFF are also reserved for use by programs.
- REG_BINARY: Most hardware component information is stored as binary data and is displayed in Registry Editor in hexadecimal format.
- REG_DWORD :Data represented by a number that is 4 bytes long. Many parameters for device drivers and services are this type and are displayed in Registry Editor in binary, hexadecimal, or decimal format.
- REG_EXPAND_SZ :A variable-length data string. This data type includes variables that are resolved when a program or service uses the data.
- REG_MULTI_SZ :A multiple string. Values that contain lists or multiple values in a form that people can read are usually this type. Entries are separated by spaces, commas, or other marks.
- REG_SZ.A fixed-length text string.
- REG_FULL_RESOURCE_DESCRIPTOR:A series of nested arrays designed to store a resource list for a hardware component or driver.
- Change keys and values
- To find a string, value, or key
- Open Registry Editor.
- On the Edit menu, click Find.
- In Find what, type the string, value, or key you want to find.
- Select the Keys, Values, Data, and Match whole string only check boxes to match the type of search you want, and then click Find Next.
- To add a registry key to Favorites
- To open Registry Editor, click Start, click Run, type regedit, and then click OK.
- You can create a list of favorite/frequently visited registry keys.
- To remove a registry key from the Favorites list, on the Favorites menu, click Remove Favorite, and you can select one or more registry keys to remove from the Favorites list.Renaming a favorite does not rename the corresponding registry key.
- To add a value to a registry key entry
- Open Registry Editor.
- Click the key or entry where you want to add the new value.
- On the Edit menu, point to New, and then click the type of value you want to add: String Value, Binary Value, DWORD Value, Multi-String Value, or Expandable String Value.
- Type a name for the new value, and then press ENTER.
- To rename a registry key or value
- Open Registry Editor.
- Click the key or entry you want to rename.
- On the Edit menu, click Rename.
- Type the new name, and then press ENTER.
- To connect to a registry over a network
- Open Registry Editor.
- On the File menu, click Connect Network Registry.
- In the Select Computer dialog box, type the name of the computer to whose registry you want to connect.
- To disconnect from a network registry
- Open Registry Editor.
- On the File menu, click Disconnect Network Registry.
- In the Disconnect Network Registry dialog box,
- click the name of the computer from whose registry you want to disconnect.
- To copy a registry key name
- Open Registry Editor.
- In the registry tree (on the left), click a registry key.
- On the Edit menu, click Copy Key Name.
- Paste the name of the registry key into another program or document.
- To restore the registry
- Open Registry Editor.
- Click Start, and then click Shut Down.
- In the list, click Restart, and then click OK.
- When you see the message Please select the operating system to start, press F8.
- Use the arrow keys to highlight Last Known Good Configuration, and then press ENTER.
- NUM LOCK must be off before the arrow keys on the numeric keypad will function.
- Use the arrow keys to highlight an operating system, and then press ENTER.
- Choosing Last Known Good Configuration provides a way to recover from problems such as a newly added driver that may be incorrect for your hardware. It does not solve problems caused by corrupted or missing drivers or files.
- When you choose Last Known Good Configuration, Windows restores information in registry key HKLM\System\CurrentControlSet only. Any changes you have made in other registry keys remain.
- Exporting registry files
- Open Registry Editor. If you want to save only a particular branch, select it.
- On the File menu, click Export….
- In File name, enter a name for the registry file.
- In Save as type, select the file type you wish to use for the saved file (registration file, registry hive file, text file, Windows 98/NT4.0 registration file).
- In Export Range, use the radio buttons to select whether you want to export the entire registry or only the selected branch.
- Click Save.
- Registry Editor provides a number of commands that are designed primarily for maintaining your system.
- For example, Load Hive and Unload Hive allow a part of your system to be temporarily downloaded onto another computer for maintenance. Before a hive can be loaded or restored, it must be saved as a key,
- Either to a floppy disk or to your hard disk.
- Importing registry files
- Open Registry Editor.
- On the File menu, click Import
- Find the file you want to import, click the file to select it, and then click Open.
- A restored hive overwrites an existing registry key and becomes a permanent part of your configuration. For example, to perform maintenance on part of your system, you can use Export… to save a hive to a disk. When you are ready, you can then use Import… on the File menu to restore the saved key to your system
- To grant full control of a registry key
- Open Registry Editor.
- Click the key to which you want to grant full control.
- On the Edit menu, click Permissions.
- Under Group or user names, click the user to whom you want to grant full control of your registry key.
- Under Permissions for name, where name represents the name of the user to whom you are granting full control of the key, select the Allow check box for Full Control.

- To Assign permissions to a registry key
- Open Registry Editor.
- Click the key to which you want to assign permissions.
- On the Edit menu, click Permissions.
- Assign an access level to the selected key as follows
- To grant the user permission to read the key contents, but not save any changes made to the file, under Permissions for name, for Read, select the Allow check box.
- To grant the user permission to open, edit, and take ownership of the selected key, under Permissions for name, for Full Control, select the Allow check box.
- To grant the user special permission in the selected key, click Advanced.
- If you are assigning permissions to a subkey and you want the inheritable permissions assigned to the parent key to apply to the subkey also, click Advanced and select the Inherit from parents the permission entries that apply to child objects. Include these with entries explicitly defined here check box.
- To Assign special access to a registry key
- Open Registry Editor.
- Click the key to which you want to assign special access.
- On the Edit menu, click Permissions.
- Click Advanced, and then double-click the user or group to whom you want to assign special access.
- Under Permissions, select the Allow or Deny check box for each permission you want to allow or deny.
- To add users or groups to the Permissions list
- Open Registry Editor.
- Click the key whose Permissions list you want to change.
-

- On the Edit menu, click Permissions, and then click Add.
- In the Select Users, Computers, or Groups dialog box, click Locations, and then click the computer or domain of the users and groups you want to view.
- Type the name or names of the users or groups you would like to add, separating each name with a semicolon. Click Check Names to validate names with the directory.
- When you are finished entering names, click OK.
- In the Permissions dialog box, under Permissions for name, assign a type of access to the selected user or group as follows:
- To grant the user permission to read the key contents but not to save any changes made to it, select the Allow check box for Read.
- To grant the user permission to open, edit, and take ownership of the selected key, select the Allow check box for Full Control.
- If the check boxes under Permissions are shaded, the key has inherited permissions from the parent object key.
- To allow permissions assigned to a parent key to apply to its subkeys also, click Advanced, and select the Inherit from parent the permission entries that apply to child objects. Include these with
- entries explicitly defined here check box.
- In the Select Users, Computers, or Groups dialog box, if you type the name, rather than selecting it, click Check Names before clicking OK.
- To remove a user or group from the Permissions list
- Open Registry Editor.
- Click the key whose Permissions list you want to change.
- On the Edit menu, click Permissions.
- Under Group or user names: , Click the name of the user or group that you want to remove from the Permissions list.
- Click Remove.
- To audit activity on a registry key
- Open Registry Editor.
- Click the key you want to audit.
- On the Edit menu, click Permissions.
- Click Advanced, and then click the Auditing tab.

- Double-click the name of a group or user.
- Under Access, select or clear the Successful and Failed check boxes for the activities that you want to audit or to stop auditing:
- Query Value->Any attempts to read a entry from a registry key
- Set Value->Any attempts to set entries in a registry key
- Create Subkey->Any attempts to create subkeys on a selected registry key
- Enumerate Subkeys->Any attempts to identify the subkeys of a registry key
- Notify->Any notification events from a key in the registry
- CreateLink->Any attempts to create a symbolic link in a particular key
- Delete->Any attempts to delete a registry object
- Write DAC ->Any attempts to write a discretionary access control list on the key
- Write Owner->Any attempts to change the owner of the selected key
- Read Control->Any attempts to open the discretionary access control list on a key
- To perform this procedure, you must be a member of the Administrators group on the local computer, or you must have been delegated the appropriate authority. If the computer is joined to a domain, members of the Domain Admins group might be able to perform this procedure. As a security best practice, consider using Run as to perform this procedure.
- If your computer is connected to a network, network policy settings might prevent you from completing this procedure.
- You must first add users and groups before specifying the events to audit.
- Auditing activity can slow the computer down significantly. Consider auditing only failures, and not successes.
- To take ownership of a registry key
- Open Registry Editor.
- Click the key you want to take ownership of
- On the Edit menu, click Permissions
- Click Advanced, and then click the Owner tab.
- Under Change owner to, click the new owner, and then click OK.
- To remove a user or group from the audit list
- Open Registry Editor
- Click the key whose Audit list you want to change
- On the Edit menu, click Permissions.
- Click Advanced, and then click the Auditing tab
- Click the user or group that you want to remove, and then click Remove
- To add users or groups to the Audit list
- Open Registry Editor.
- Click the key you want to audit
- On the Edit menu, click Permissions
- Click Advanced, click the Auditing tab, and then click Add

- Click Object Types, select the type or types of users or groups you want to find, and then click OK.
- Click Locations, select the computer or domain of the users or groups you want to view, and then click OK.
- Type the name of the user or group you want to add and then click OK to open the Auditing Entry dialog box, or click Advanced to search for a user, computer, or group based on parameters you set.
Windows Deployment Services
- Windows Deployment Services is a server role that enables you to remotely deploy Windows operating systems. You can use it to set up new computers by using a network-based installation.
- This means that you do not have to install each operating system directly from a CD or DVD.
- Allows network-based installation of Windows operating systems, which reduces the complexity and cost when compared to manual installations.
- Supports mixed environments including Windows XP and Windows Server 2003 through Windows 7 and Windows Server 2008 R2.
- Uses standard Windows Setup technologies including Windows Preinstallation Environment (Windows PE), .wim files, and image-based setup.
- Ensure that you are a Domain Administrator
- Installation Of the ADDS A Windows Deployment Services server must be either a member of an AD DS domain or a domain controller for an AD DS domain. DNS. You must have a working DNS server on the network before you can run Windows Deployment Services.
- Configuration Of the DHCP Server. You must have a working DHCP server with an active scope on the network because Windows Deployment Services uses PXE, which relies on DHCP for IP addressing.
- NTFS volume. The server running Windows Deployment Services requires an NTFS file system volume for the image store.
- Credentials. To install the role, you must be a member of the Local Administrators group on the server. To initialize the server, you must be a member of the Domain Users group.
- Installing Windows Deployment Services,
- Click Start, click Administrative Tools, click Server Manager,

- In Roles Summary click Add Roles, click Next,. and then select Windows Deployment Services.

- Click – > Next Click the both Check Boxes .
- Transport Server. You can install only the Transport Server role service. This role service provides a subset of the functionality of Windows Deployment Services and you can install it in environments that do not have Active Directory Domain Services, DHCP, or DNS.
- Deployment Server. You can install both the Deployment Server and Transport Server role services, which provides the full functionality of Windows Deployment Services. (You cannot install only Deployment Server without Transport Server.)
- Click –> Finish.
- Configuration Of WDS Server
- Click –> Start, Click-> Administrative Tools, and then Click ->Windows Deployment Services.
- Remote Installation Folder location Page open it .This folder contain boot images and install images.PXE boot files and WDS management tools.Browse the location .or default location will be C:/Remoteinstall. Click –>Next
-

- If you install its Default location then a System Volume Warning Message box appears.Click->Yes
- Next Page will be DHCP option 60. Click On Both Check boxes .Click –> Next

- Next Page Showing Task Progress.Click –>Finish

- After Finishing Process this Page Showing Operation Complete.
- Click-> on Check Box option-> ADD images to Server Now If You want to Add Images Click –>Finish

- The location of Windows Server2008 and Windows Vista & Windows 7 Install and boot images in the Sources subdirectory of the installation Media.
- Browse the DVD Sources Folder Click- > OK

- Next Windows Shows that Windows 7 has Five Install Image & One boot Images.
- Click –>Next

- Next Page Showing Task Progress.Click –>Finish

- The selected Images were successfully Added to the server Click –>Finish

- Complete the steps in this section.
- On the Client Side Computer Settings
- Configure the BIOS of the computer to Enable PXE booting, and then set the boot order so that the computer boots from the network first.
- Restart the computer and when prompted, press F12 to initiate a network boot.
- If you are presented with a boot image selection screen, select the appropriate boot image. This screen will only be available if you have two or more boot images on the Windows Deployment Services server.
- On the first screen of the Windows Deployment Services client user interface, select the locale and input method, and click Next.
- When prompted, provide a user name and password with sufficient credentials to install images from the Windows Deployment Services server.
- Continue to follow the instructions provided in the Windows Deployment Services client user interface.
- When image installation is complete, the computer will restart and Windows Setup will continue.
Installation of Active Directory Domain Services(ADDS)
- Click Start -> Run type the dcpromo.exe command in the Run Dialog Box.

- Welcome to the Active Directory Domain Services Installation Wizard opens click –>Next

- The Operating System Window Compatibility opens Click-> Next

- Next page is choose a Deployment Configuration
- There is two options if already existing forest then choose otherwise
- select option Create a new domain in a new forest. Click –> Next

- Specify the Name of Forest Root Domain.In this case we give the DNS name of the Domain and Click –> Next

- Checking whether the new forest name is already use or not.and Click –> Next

- After the verification the set forest functional Page Appears.
- We Select Domain functional level Windows Server 2003 and Click –> Next

- The Additional Domain Controller Options Page Appears
- .In the Default DNS Server Checkbox is selected

- Examine DNS configuration Click –> Next.

- A Static IP assignment Page Appears.Click –>Yes , the computer will use a Dynamically assigned IP address.(not recommend).
- Active Directory Domain Services Installation Wizard message box appear. Do You want to continue Click –>Yes

- Location for Database ,Log Files, and SYSVOL Page Appear Click the Next Button .

- Assign a Password for the Directory Services Restore Mode Administrator Password. Click –> Next

- Next Page Summary of Your Active Directory Installation Wizard Click –>Next

- After the ADDS installation Completion .You are required to reboot the computer by clicking the checkbox option Reboot on completion.

- If you not check the box then this window Appear. But You must restart Your Computer to finishing Role.
- Click on Restart Now

- After the Restart the Server Manager shows the Domain Created.

Configuring a DHCP server
- DHCP server role:
- All computers and other devices on your TCP/IP network must have an IP address in order for the network to function properly.
- IP addresses can be configured manually at each computer, or you can deploy a DHCP server that automatically assigns IP address leases to all DHCP clients on the network.
- Most client operating systems seek an IP address lease by default, so no configuration on the client computer is necessary to implement a DHCP enabled network; the first step is to deploy a DHCP server
- DHCP is a client-server technology that allows DHCP servers to assign, or lease, IP addresses to computers and other devices that are enabled as DHCP clients.
- Before your DHCP server can provide IP address leases to clients, however, a range of IP addresses must be defined at the DHCP server.
- This range, known as a scope, defines a single physical subnet on your network to which DHCP services are offered. So, for example, if you have two subnets, your DHCP server must be connected to each subnet and you must define a scope for each subnet.
- Install a DHCP SERVER
- Click Start, click Administrative Tools, click Server Manager,

- In Roles Summary click Add Roles, click Next,.

- Check DHCP server, and then click Next
![image_thumb5[1] image_thumb5[1]](https://ravindrakatiyar.files.wordpress.com/2013/09/image_thumb51_thumb.png?w=413&h=306)
- Select Only Network connections that you want the DHCP server to use.

- Click Next to open the SpecifyIPv4 DNS Server Settings .

- Click Next to open the Specify WINS Server Settings .
- If you Need to support legacy Clients or Applications then choose option WINS is required for Applications on the network otherwise
- Select default WINS is not required Applications for the networks.
![image_thumb10[1] image_thumb10[1]](https://ravindrakatiyar.files.wordpress.com/2013/09/image_thumb101_thumb.png?w=411&h=303)
- Scopes also provide the primary way for the server to manage distribution and assignment of IP addresses and any related configuration parameters to clients on the network.
- Click Next to Open the Add or Edit DHCP Scope..

- Click Next to Open the Configure DHCPv6 Stateless Mode Page and select Option. Enable DHCPv6 state mode for the server.

- Click Next to open the SpecifyIPv6 DNS Server Settings .

- Click Next to Open the Authorize DHCP Server page.
- Select option Use Current Crendentials.or Use alternate Crendentials.
- If you Skip authorization of the DHCP server in ADDS .DHCP Server will not function.until you authorize.

- Click Next to open the confirm Installation Page Click Install to Installation of the DHCP Server Role.

- `When the Installation completes .The page will display the message installation successful. If reboot required restart the server.
How to Install Win 98 in a Virtual Box
- Download the Virtual Box this site https://www.virtualbox.org/wiki/Downloads.
- After the Download is complete .Double Click the Virtual Box.exe.
- Oracle VM virtual Box Setup window will be open.
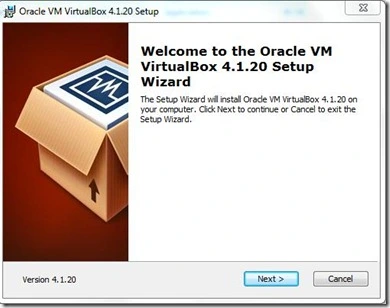
- Click on Next .
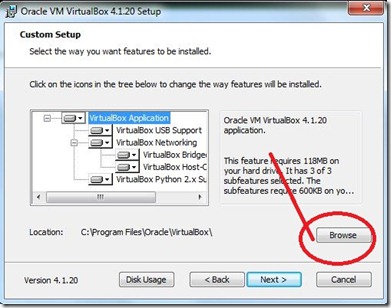
- Browse the install location Click Next.
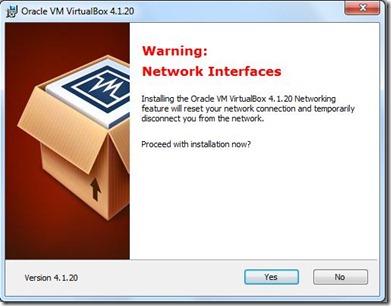
- Next Window will be Warning Network Interface Click Yes
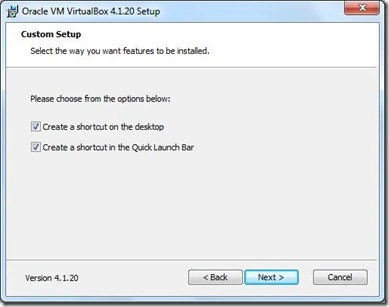
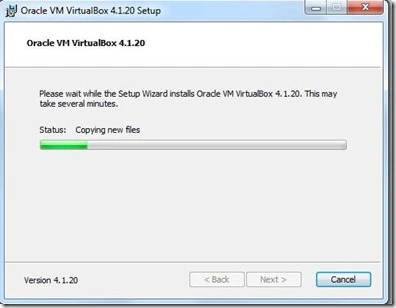
- Now set up copying new files.Click Next .
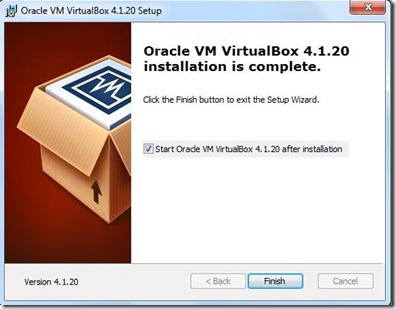
- Now set will Be Finish .Click on Finish. Exit the Setup Wizard.
- Open the Virtual Manager Wizard.The left part of this window is a list of all virtual machines on your computer.
- The list is empty now because you haven’t created any virtual machines yet.
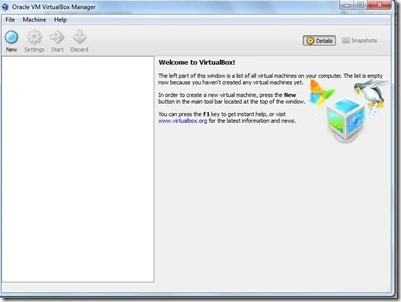
- In order to create a new virtual machine, press the New button in the main tool bar located at the top of the window
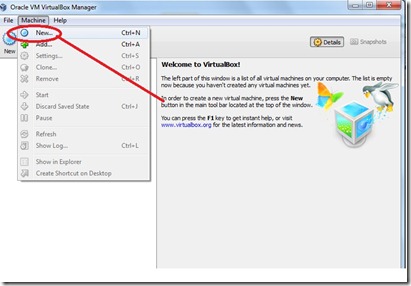
- Click –> Machine Choose –> New. Click On New this window will Be open.
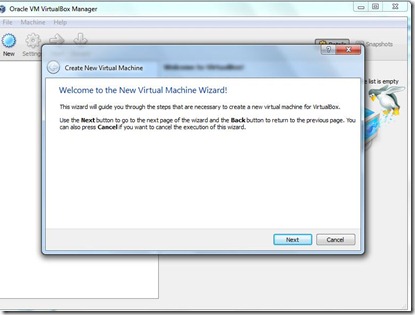
- Click-> Next Give the Name .and Select the OS You Want to Install.
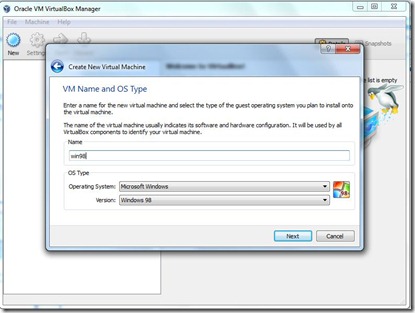
- Here We give the Name win98 . Click on Next.
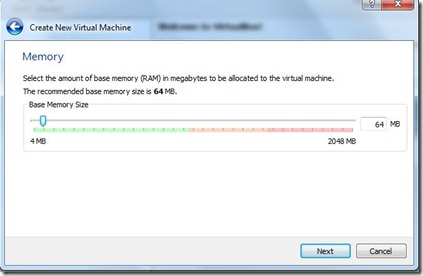
- You can Select the memory for this VM. Click Next.
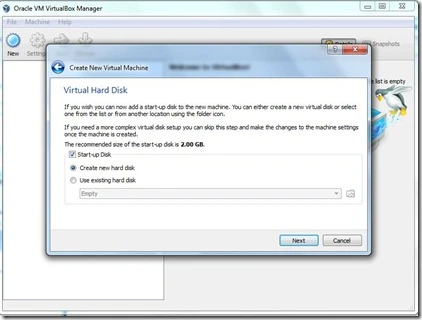
- This wizard will help you to create a new virtual disk for your virtual machine.
- Please choose the type of file that you would like to use for the new virtual disk.
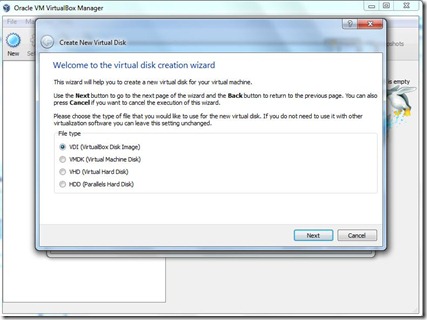
- If you do not need to use it with other virtualization software you can leave this setting unchanged. Click Next.
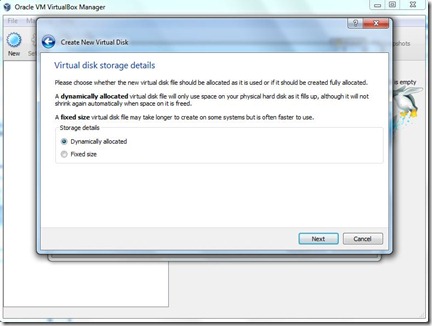
- You Choose Dynamically allocated or the fixed size . Click Next.
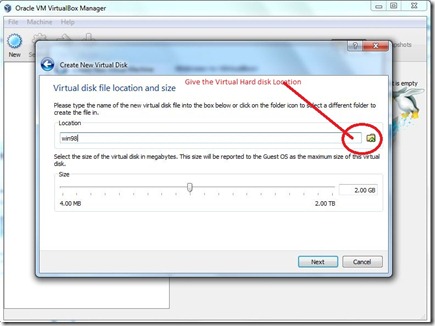
- Give the Virtual Hard disk location Folder Click Next.
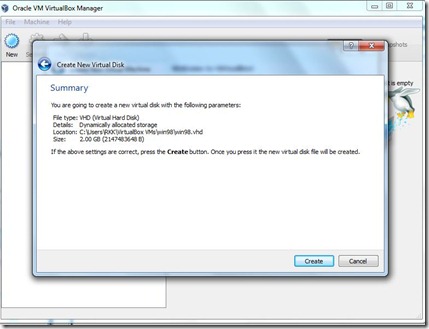
- If the above is correct press the Create button. Once you press it, a new virtual machine will be created.
- you can alter these and all other setting of the created virtual machine at any time using the Settings dialog accessible through the menu of the main window.
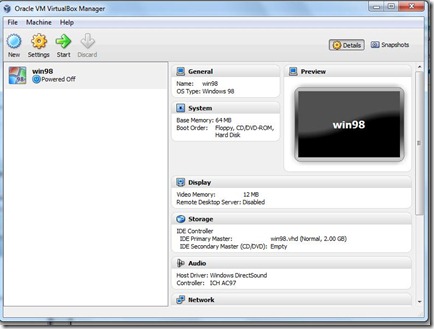
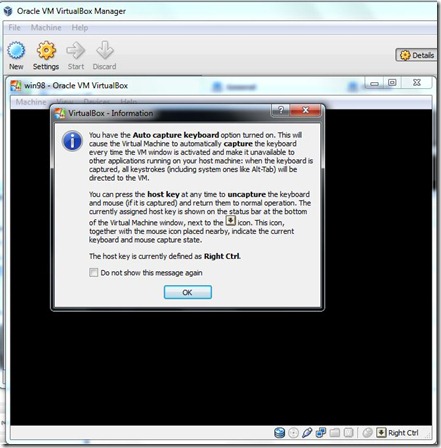
- Click On the Start .this Dialog box will be open it .Click OK
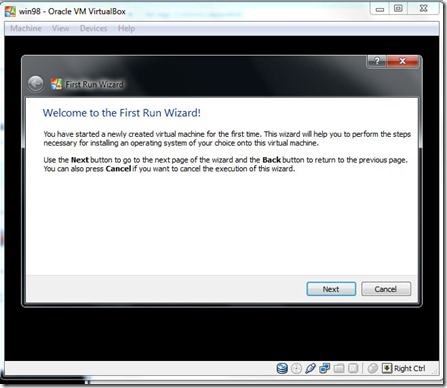
- Welcome to First Run Wizard Click on Next.
- Select the media which contains the setup program of the operating system you want to install.
- This media must be bootable, otherwise the setup program will not be able to start.
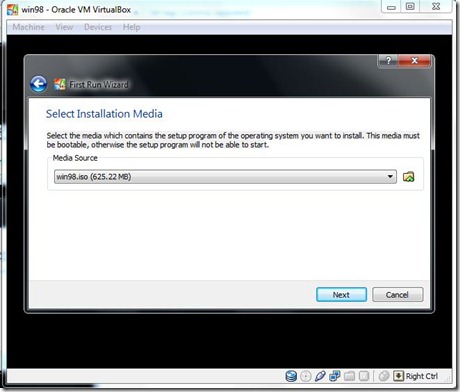
- Browse the 98bootableiso location .Click on Next.
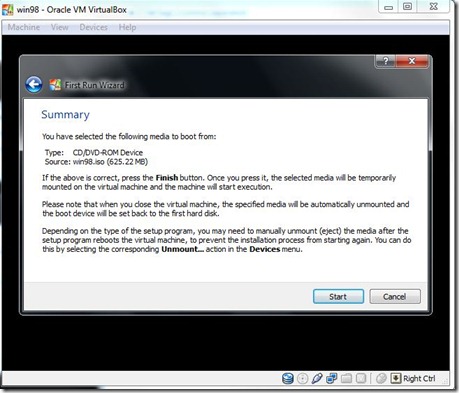
- Click On Start Button. Microsoft Window98 CD Startup menu Started
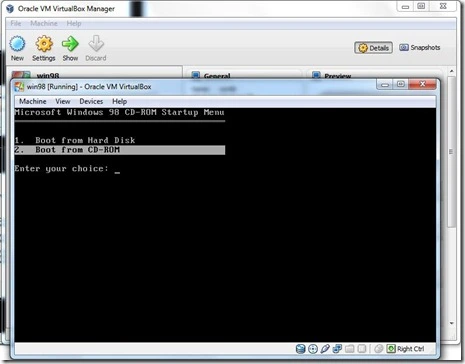
- Enter Your Choice. Select Boot From CD-ROM Press Enter.
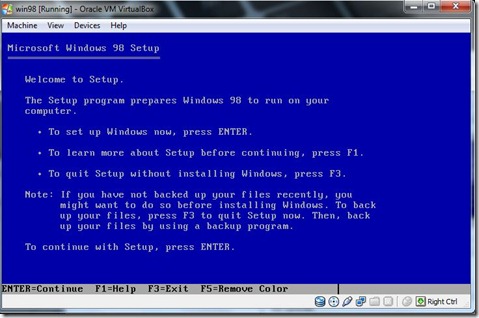
- To continue Setup Press Enter
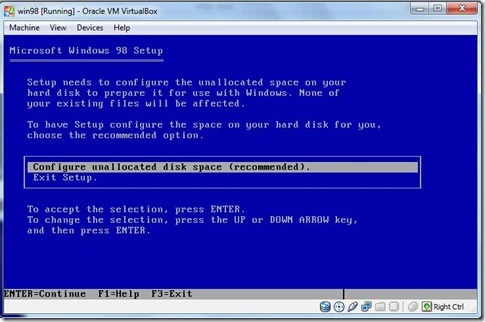
- Configure the unallocated space .Press Enter.
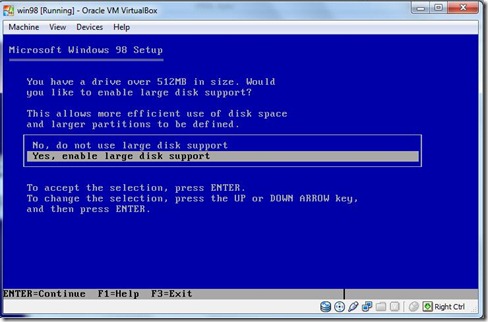
- Select the large enable support press Enter.
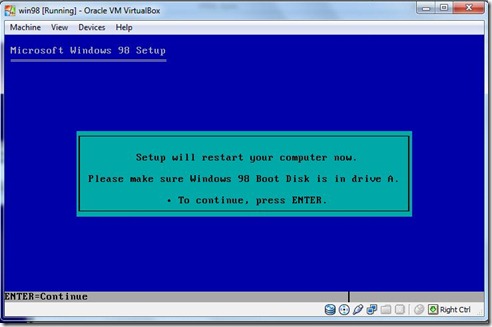
- Continue the Setup Press Enter. Reboot the system Automatically .
- Choose Option Boot from CD-ROM.
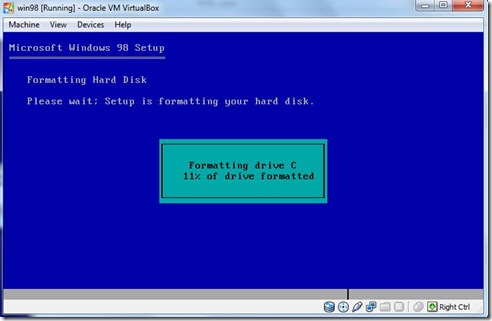
- Formatting the hard disk window will be appear.
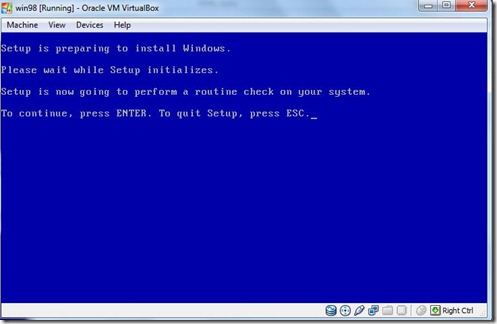
- Set is Preparing to install Windows. to continue Press Enter.
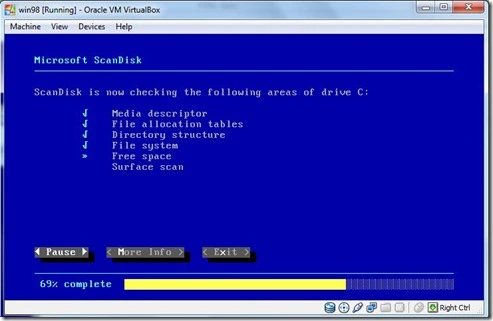
- Now scandisk will be started.
- Preparing to windows 98 setup Window will be appear .Click on Continue.
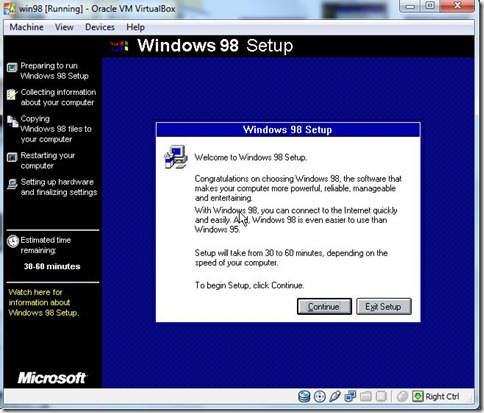
- Preparing directory Click Next.
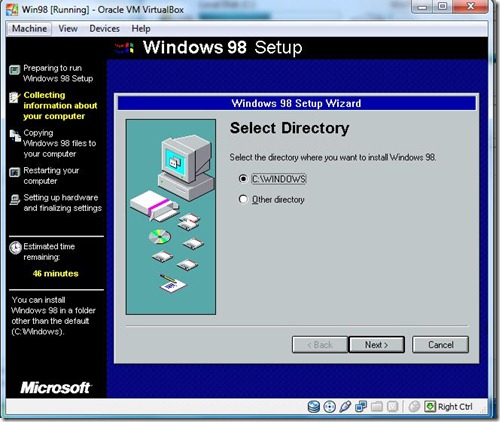
- Select the Directory . Where you want to install .Select C:\Windows Click Next.
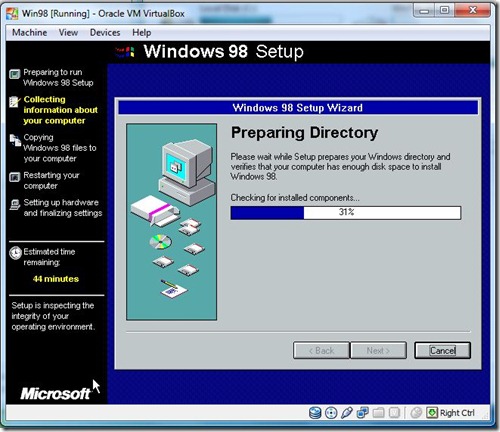
- Preparing Directory .Click Next.
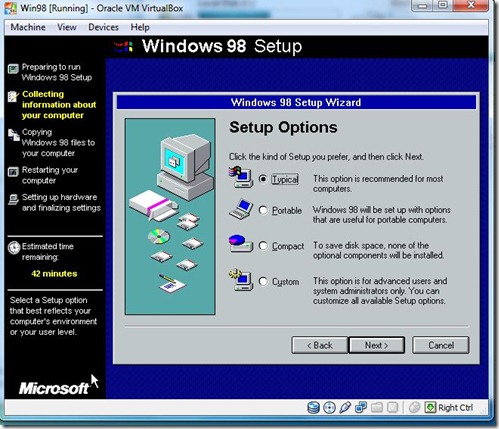
- Choose the Option and Click Next.
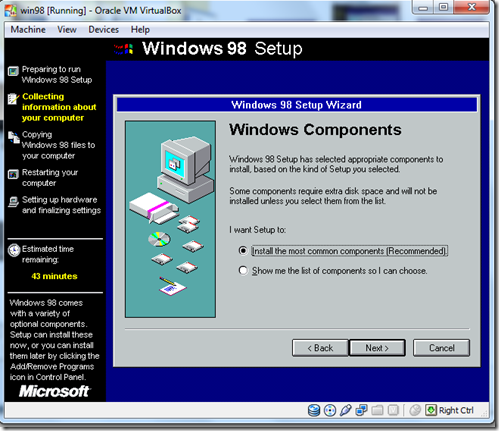
- Select the Windows Component
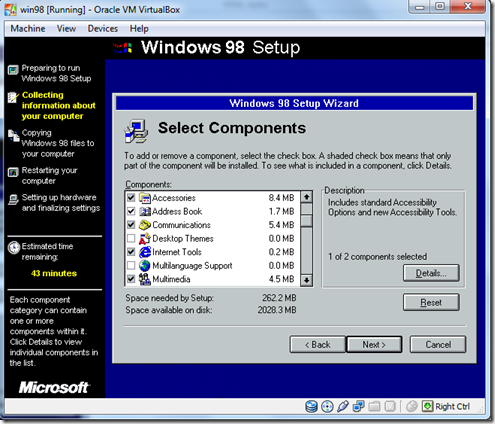
- and Click Next
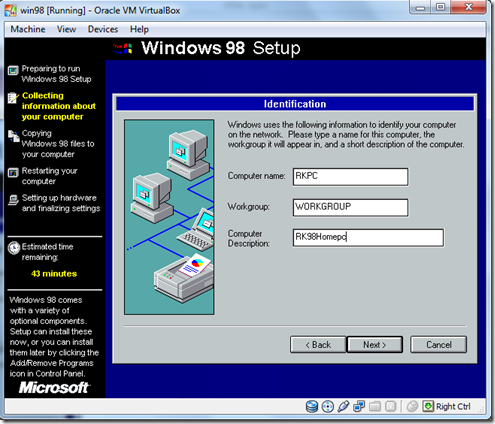
- Give The Computer Name and Description Click Next .
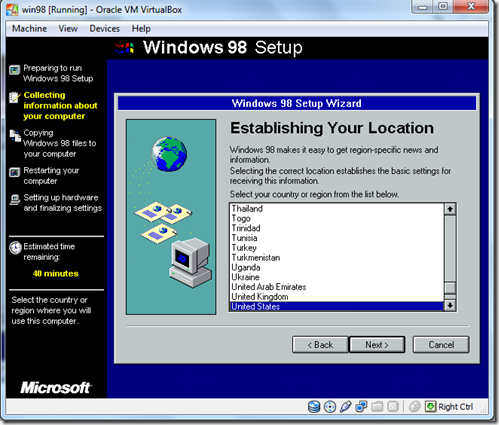
- Choose Your Location.Click Next.
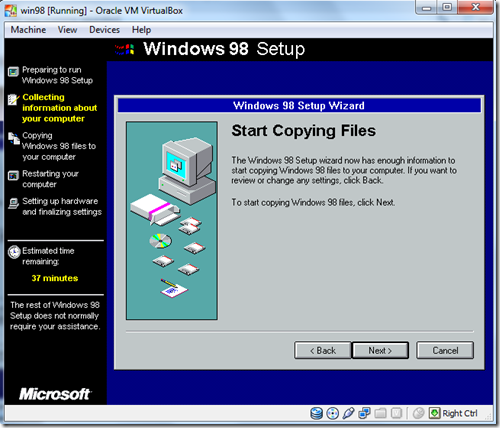
- Start copying Files Click Next.
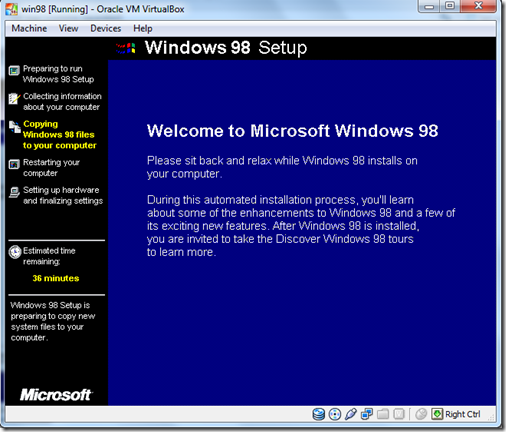
- Estimated Time will be appear & File copy Progress.
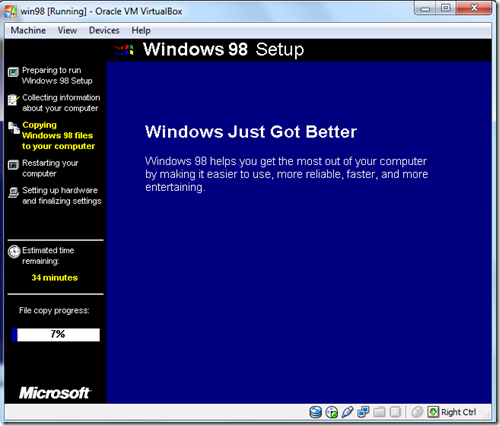
- Now Rebooting Your Computer Automatically.and boot from the Hard disk.
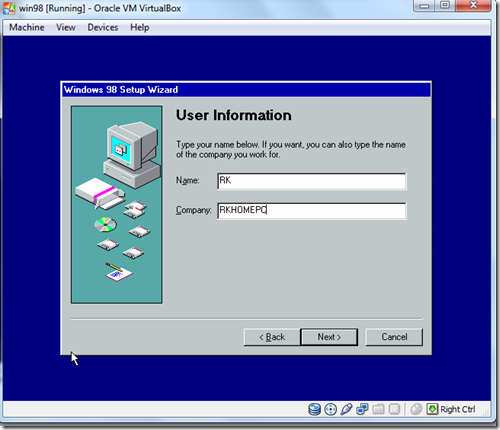
- Now Give the Information and Click Next.
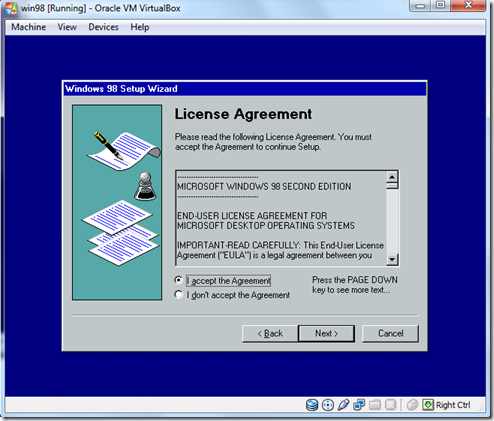
- Accept the Agreement .Installing the Product Key .and Click Next.
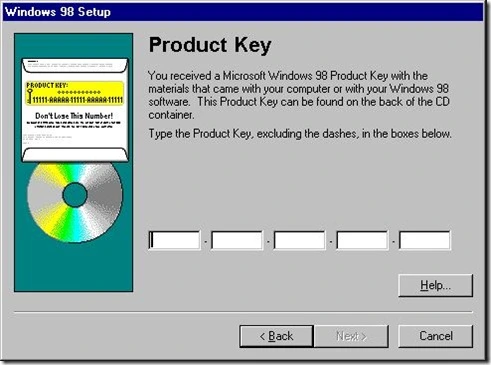
- and Click Next
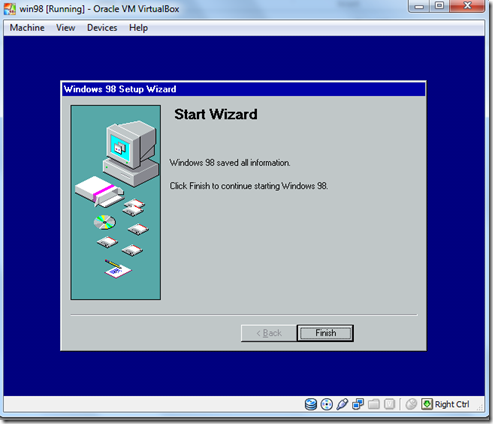
- Click the Finish.
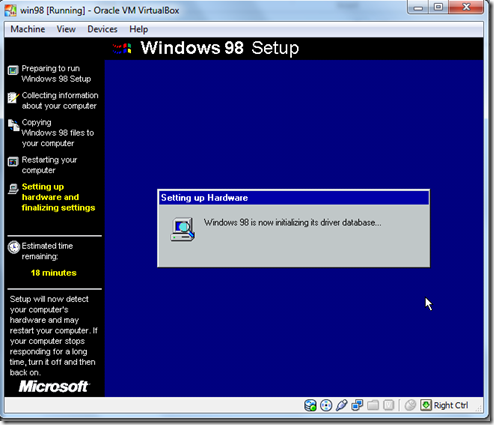
- Windows Now initializing the Driver Data base .
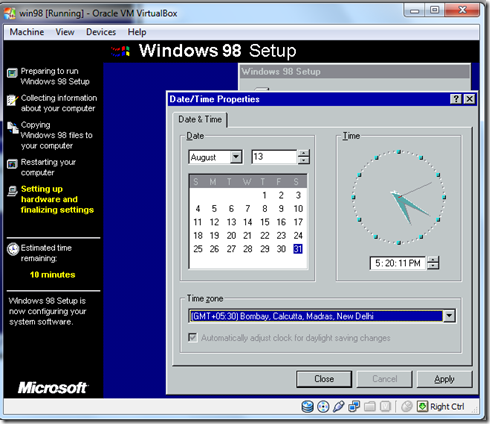
- Now Change Your Date and Time .and Click On Apply.
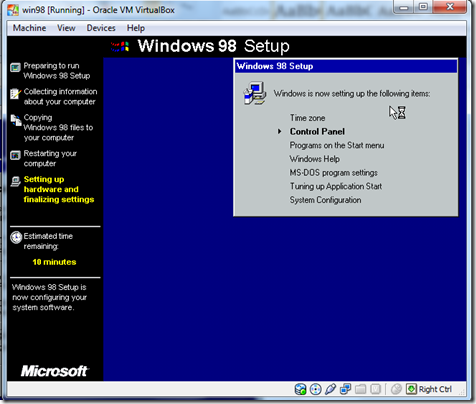
- Windows Now setting the following Items.
- Control Panel
- Programs And Start Menu
- Windows Help
- MS-DOS Program Settings
- Turning On Application Start
- System Configuration
- Window is now Updating the system Settings.
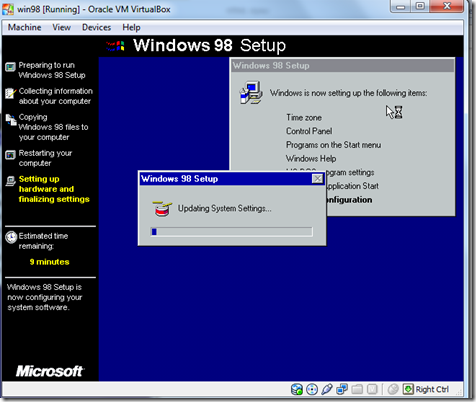
- After completing the system is Reboot now.
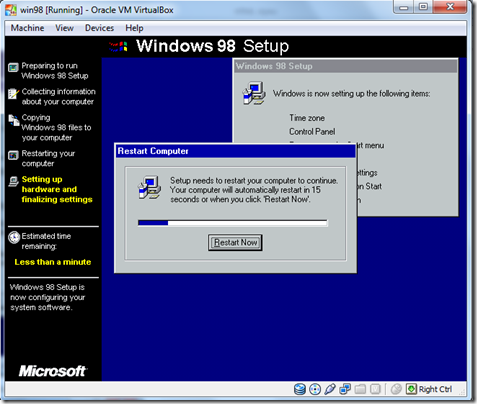
- After the Restarting the computer This dialog will be appear.
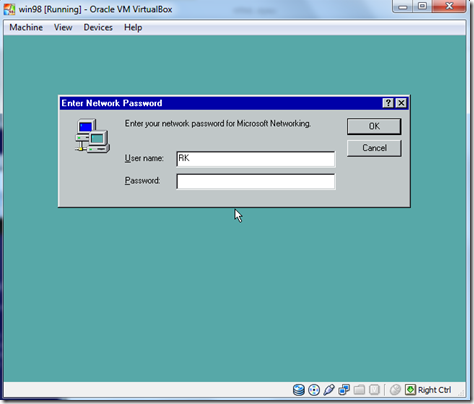
- Click OK.
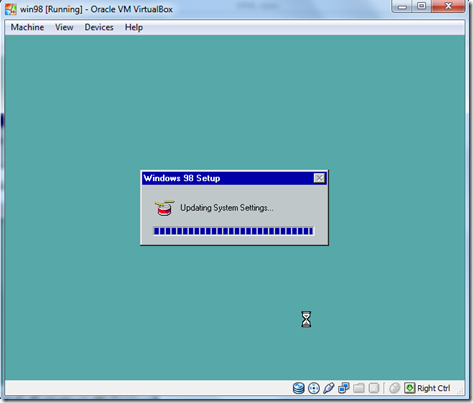
- Windows is now Update the system Settings.
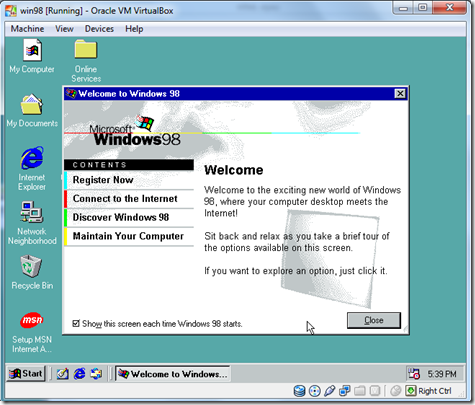
- Welcome Screen Of your Windows After installing the windows.
- Uncheck the Box the Welcome screen will not appear in again.
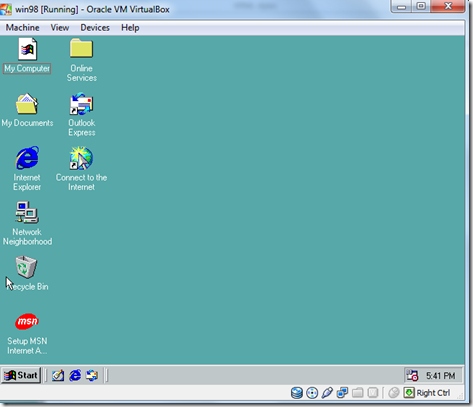
- So enjoy Your Windows 98.


