How to Install Win 98 in a Virtual Box

    • Download the Virtual Box  this  site https://www.virtualbox.org/wiki/Downloads.
    • After the Download is complete .Double  Click the  Virtual Box.exe.
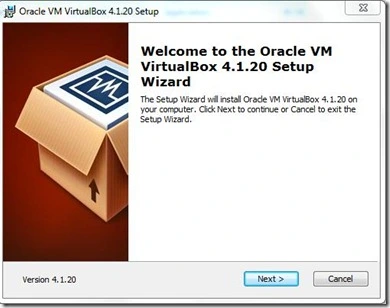
    • Oracle VM virtual Box Setup window will be open.
    • vbbox
    • Click on Next .
    • vb2
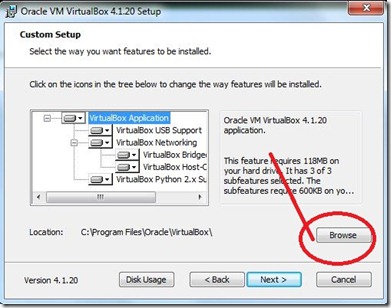
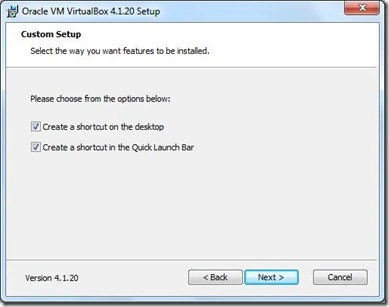
    • Browse the  install location Click Next.
    • vb3
    • Next Window  will be Warning  Network  Interface Click Yes
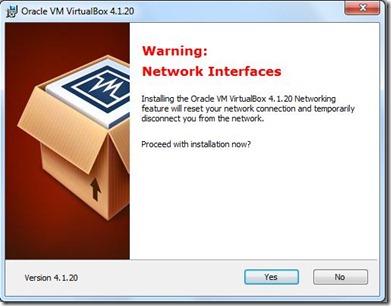
    • vb4
    • Now set up  copying new files.Click Next .
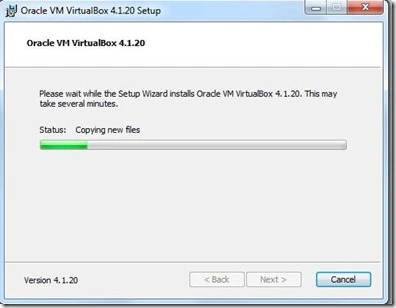
    • vb5
    • Now set will Be Finish .Click on Finish. Exit the Setup Wizard.
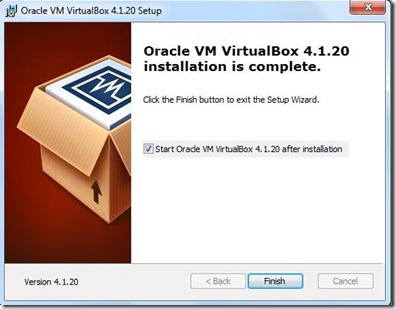
    • vb7
    • Open the Virtual Manager Wizard.The left part of this window is a list of all virtual machines on your computer.
    • The list is empty now because you haven’t created any virtual machines yet.
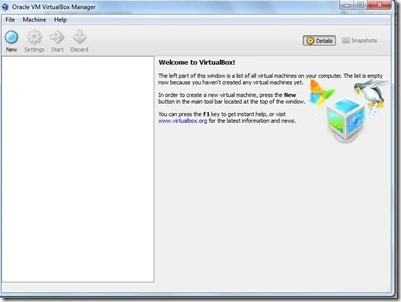
    • vb9
    • In order to create a new virtual machine, press the New button in the main tool bar located at the top of the window
    • vb10
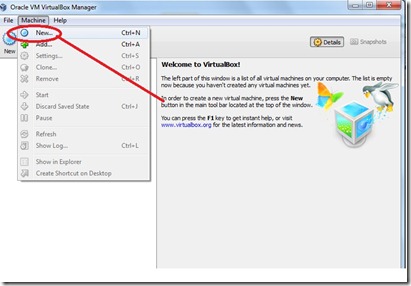
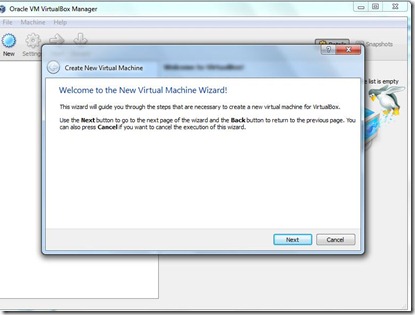
    • Click –> Machine  Choose –> New. Click  On New this window will Be open.
    • vb11
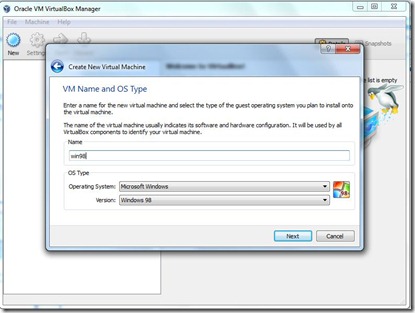
    • Click-> Next Give the Name  .and Select the OS You Want to Install.
    • win98
    • Here We give the Name win98 . Click on Next.
    • vbmem
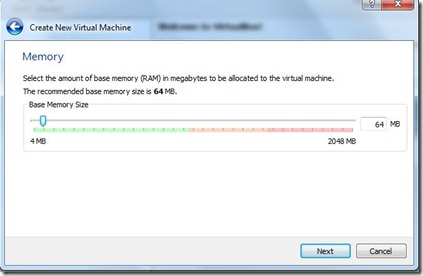
    • You  can Select the memory  for this  VM. Click Next.
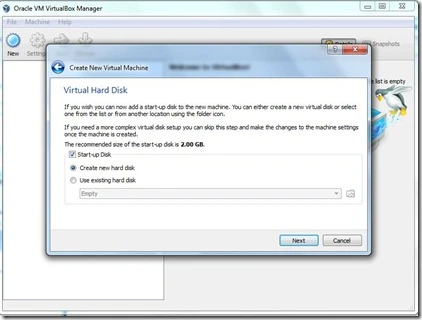
    • vhdvb
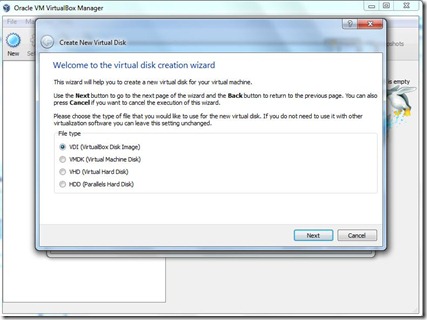
    • This wizard will help you to create a new virtual disk for your virtual machine.
    • Please choose the type of file that you would like to use for the new virtual disk.
    • vbvm2
    • If you do not need to use it with other virtualization software you can leave this setting unchanged. Click Next.
    • vbvm3
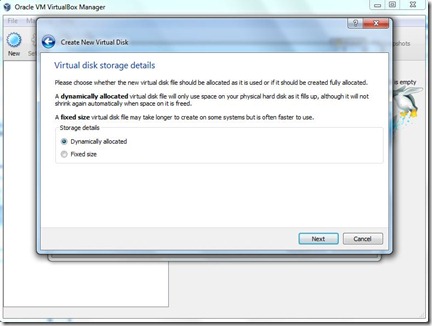
    • You Choose Dynamically allocated or the fixed size . Click Next.
    • vbmm4
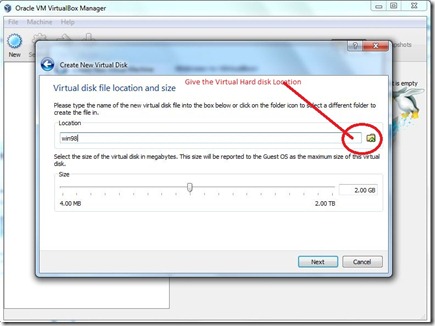
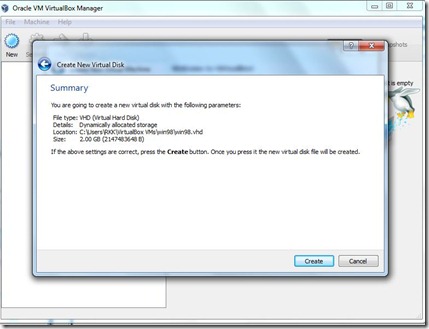
    • Give  the Virtual Hard disk location Folder Click Next.
    • vb12
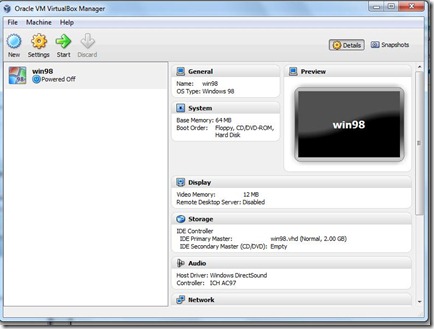
    • If the above is correct press the Create button. Once you press it, a new virtual machine will be created.
    • you can alter these and all other setting of the created virtual machine at any time using the Settings dialog accessible through the menu of the main window.
    • vbmm98
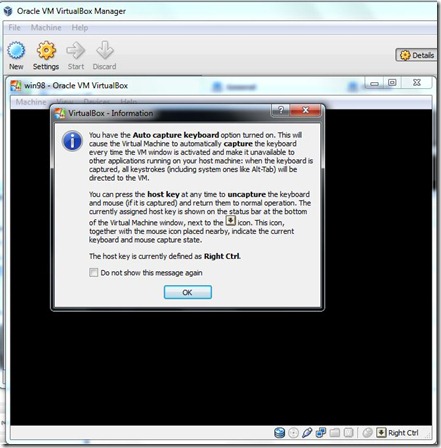
    • Click On the Start .this Dialog box will  be open it .Click OK
    • vb14
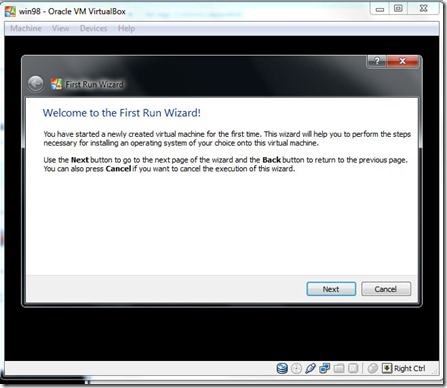
    • Welcome to First Run Wizard Click on Next.
    • firstrun
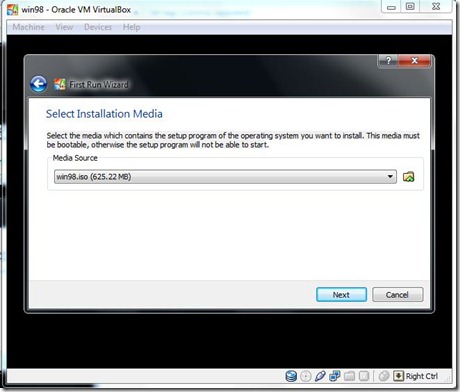
    • Select the media which contains the setup program of the operating system you want to install.
    • This media must be bootable, otherwise the setup program will not be able to start.
    • win98location
    • Browse the 98bootableiso location .Click on Next.
    • firstruwizard
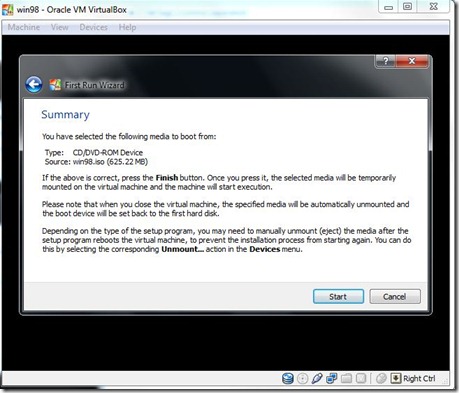
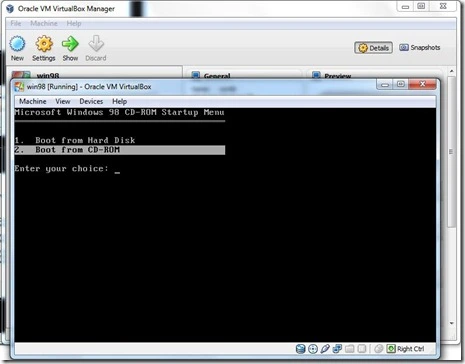
    • Click On Start Button. Microsoft Window98 CD  Startup menu  Started
    • win981
    • Enter Your Choice. Select Boot From CD-ROM Press Enter.
    • 98setup
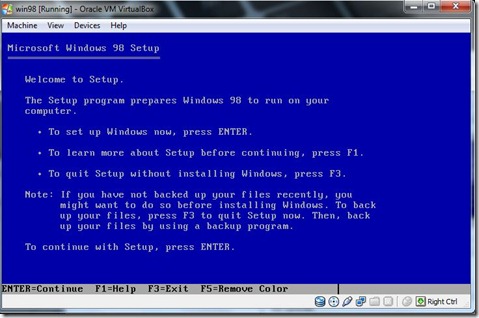
    • To continue Setup Press Enter
    • 98configure
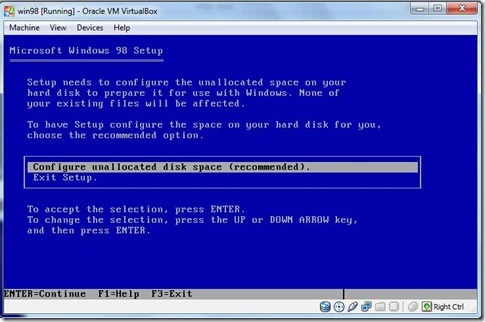
    • Configure the unallocated space .Press Enter.
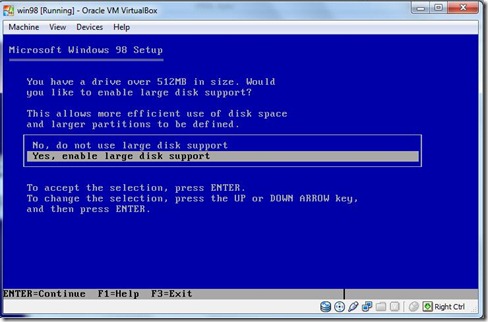
    • largeenable
    • Select the large enable support press Enter.
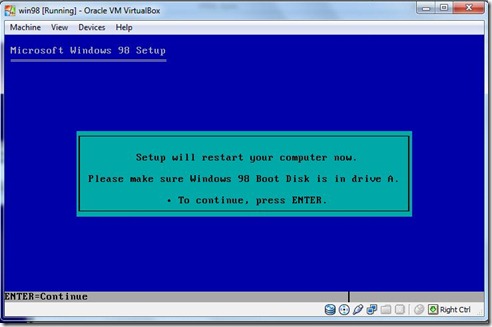
    • continue
    • Continue  the Setup Press Enter. Reboot the system Automatically .
    • Choose Option Boot from CD-ROM.
    • format
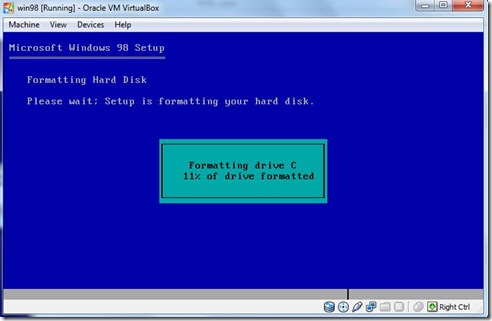
    • Formatting the hard disk window will be appear.
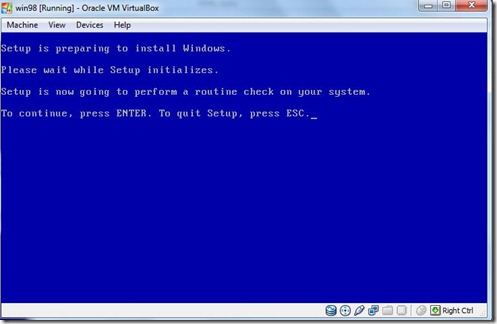
    • setuprouitne
    • Set is Preparing to install Windows. to continue  Press Enter.
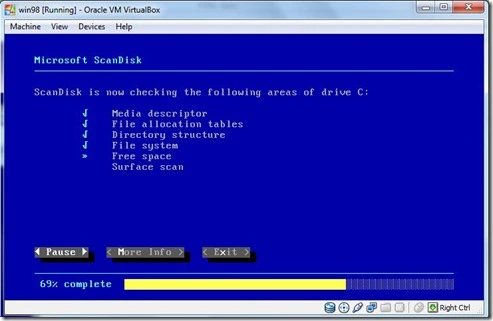
    • microsoftscandisk
    • Now scandisk will be started.
    • Preparing to  windows 98 setup Window will be appear .Click  on Continue.
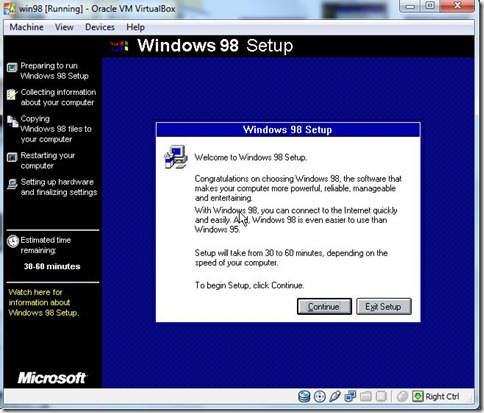
  • 98setup
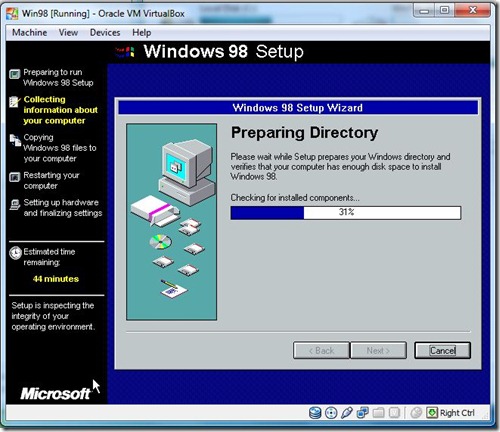
  • Preparing directory Click Next.
  • 98dir
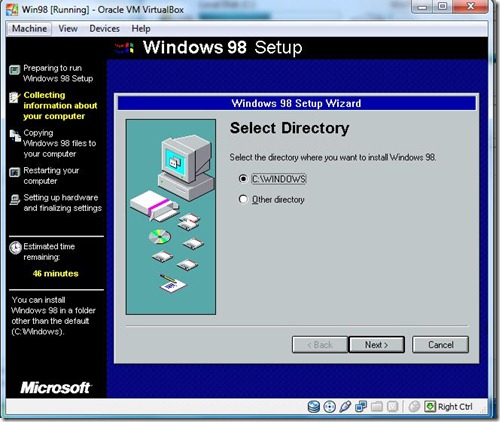
  • Select the Directory . Where you want to install .Select C:\Windows Click Next.
  • 98setup2
  • Preparing Directory .Click Next.
  • 98setup3
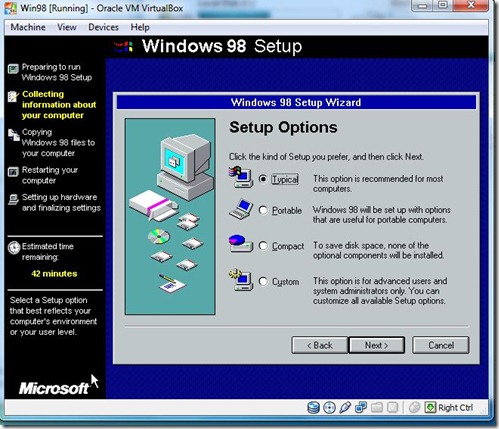
  • Choose  the Option and Click Next.
  • image
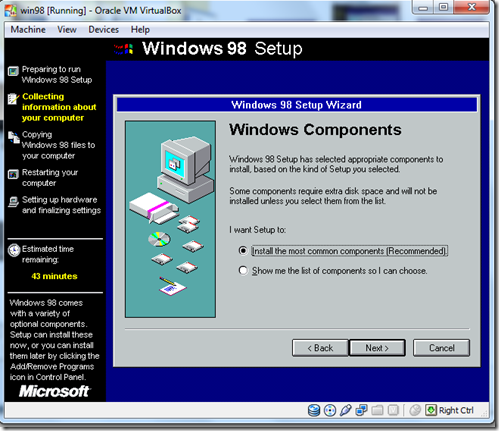
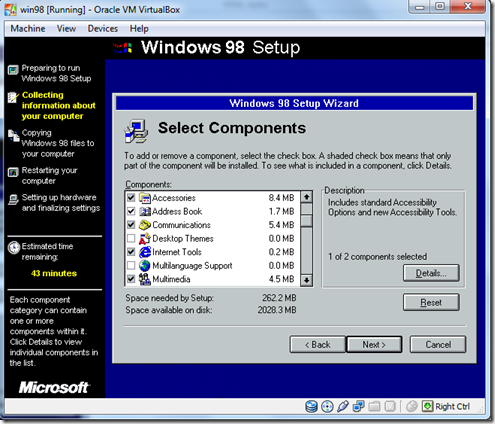
  • Select the Windows Component
  • image
  • and Click Next
  • image
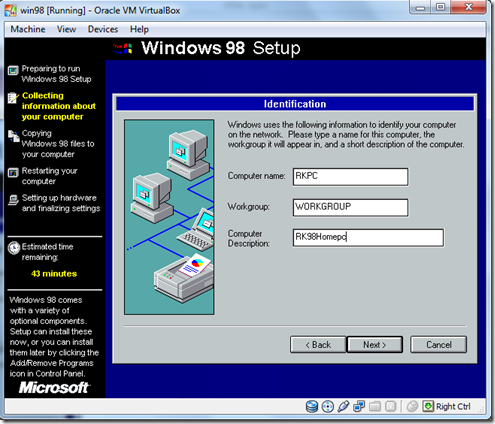
  • Give The Computer Name and Description  Click Next .
  • image
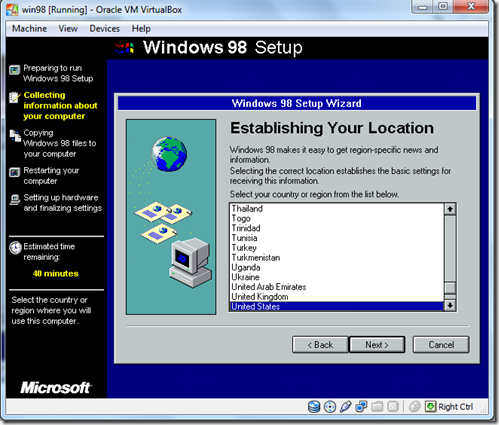
  • Choose Your Location.Click Next.
  • image
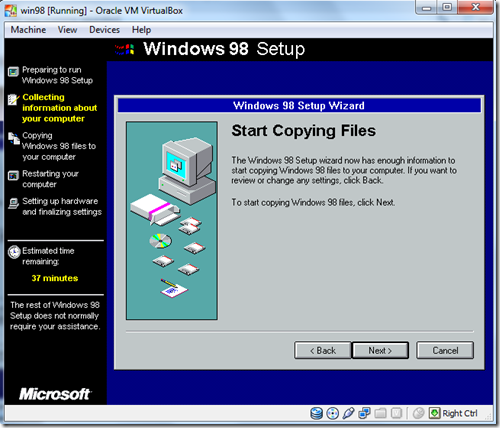
  • Start copying Files Click Next.
  • image
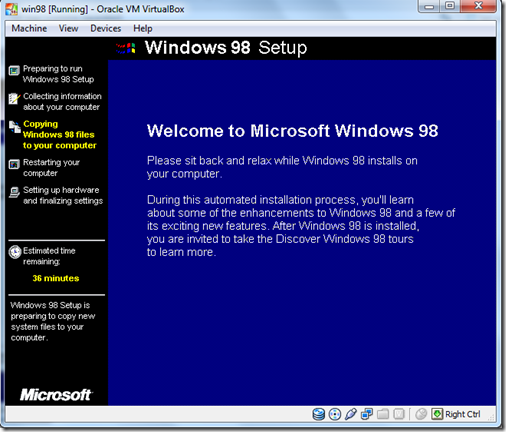
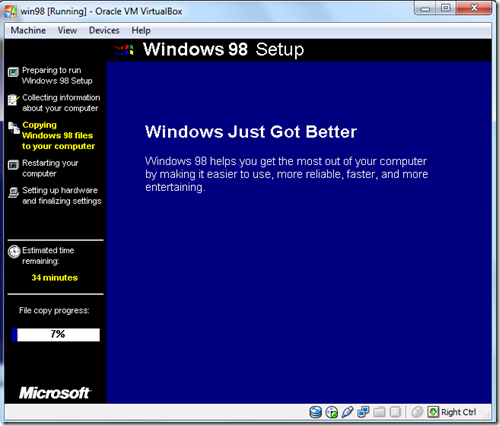
  • Estimated Time will be appear & File copy Progress.
  • image
  • Now Rebooting Your Computer Automatically.and boot from the Hard disk.
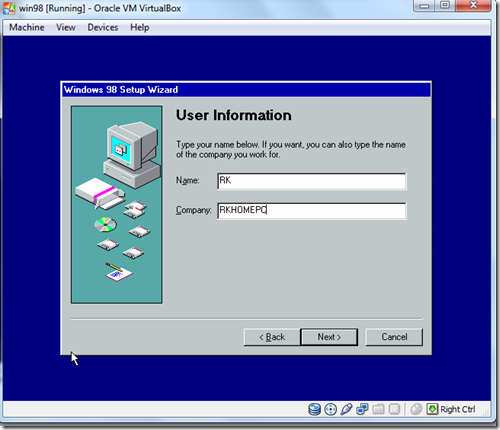
  • image
  • Now Give the Information and Click Next.
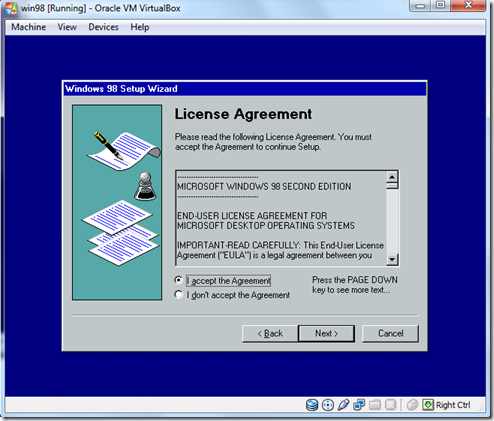
  • image
  • Accept the Agreement .Installing  the Product Key .and Click Next.
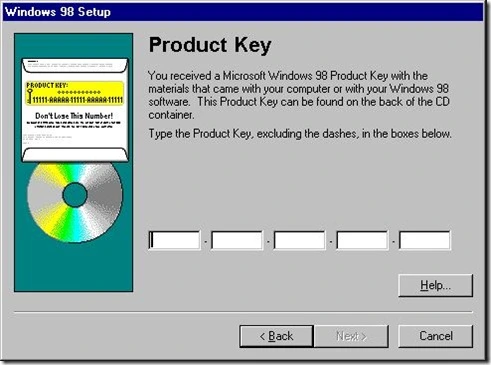
  • productkey
  • and Click Next
  • image
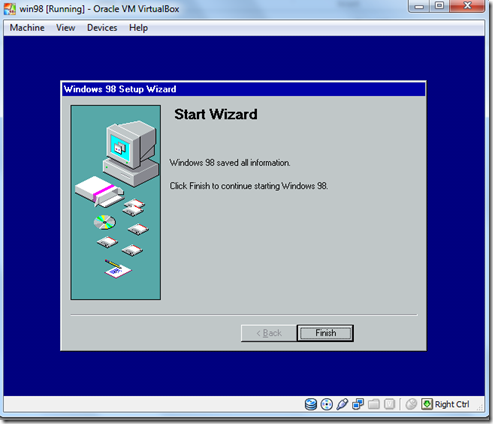
  • Click the   Finish.
  • image
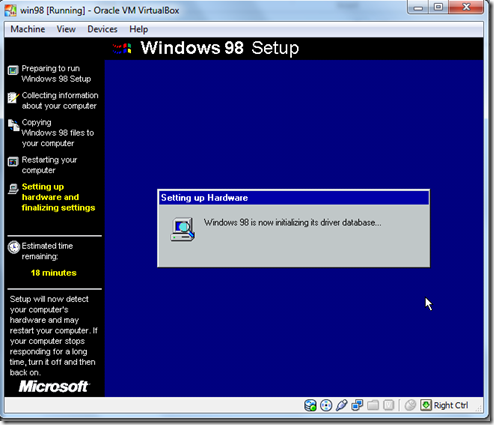
  • Windows  Now initializing the  Driver Data base .
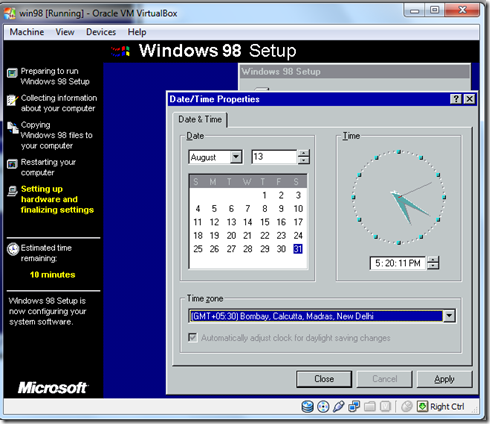
  • image
  • Now Change Your Date and Time .and Click On Apply.
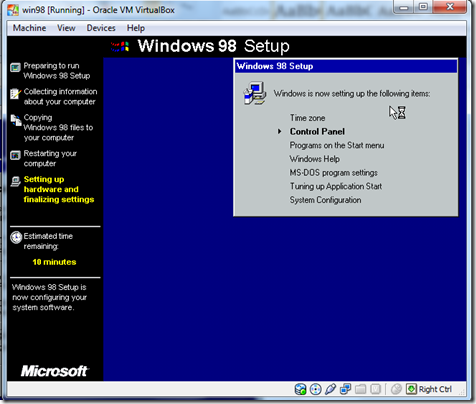
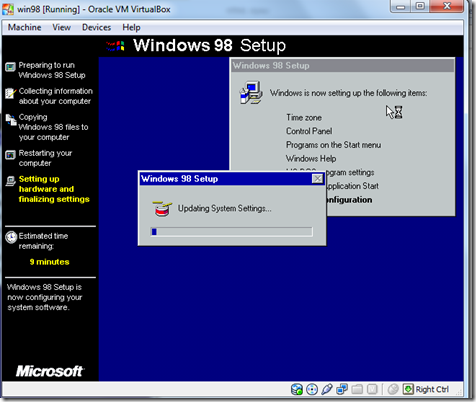
  • Windows Now setting the  following Items.
  • Control Panel
  • Programs And Start Menu
  • Windows Help
  • MS-DOS Program Settings
  • Turning On Application Start
  • System Configuration
  • image
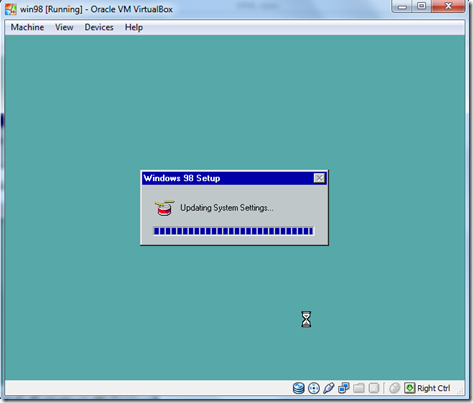
  • Window is  now Updating the system Settings.
  • image
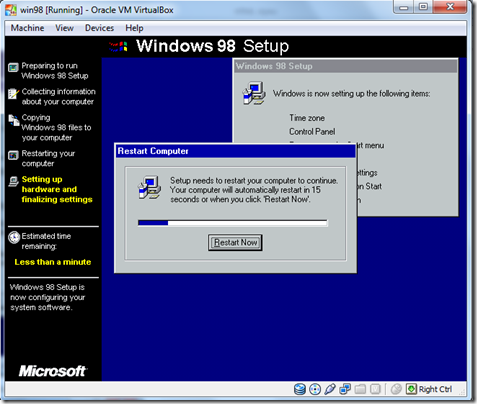
  • After completing the system is  Reboot now.
  • image
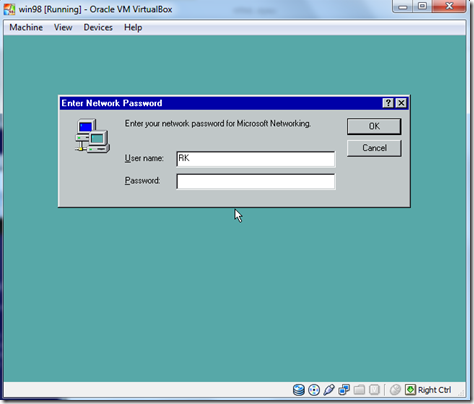
  • After the Restarting the computer This dialog will be appear.
  • image
  • Click OK.
  • image
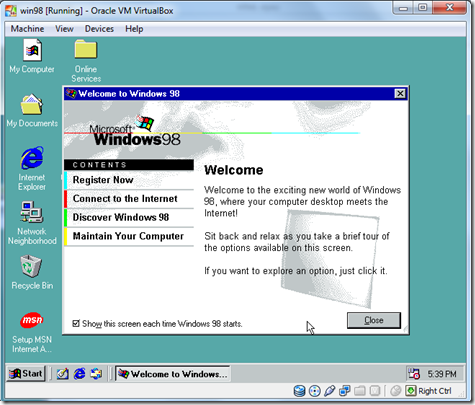
  • Windows is now Update the system Settings.
  • image
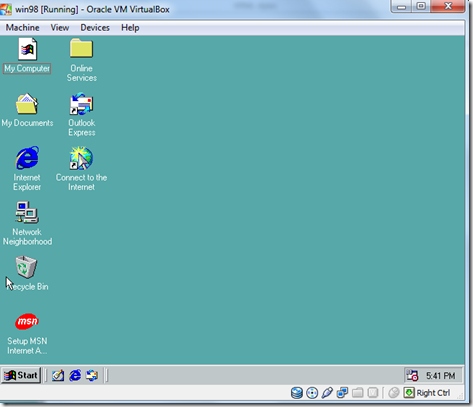
  • Welcome Screen Of your Windows  After installing the windows.
  • Uncheck the Box the Welcome screen will not appear in again.
  • image
  • So enjoy Your Windows 98.


Disk Management In Windows 7

  • Disk Management is a system utility for managing hard disks and the volumes or partitions that they contain With Disk Management,
  • you can initialize disks, create volumes, and format volumes with the FAT, FAT32, or NTFS file systems.
  • On GUID partition table (GPT) disks, you can create up to 128 primary partitions. Because GPT disks do not limit you to four partitions, you do not need to create extended partitions or logical drives.
  • Always use basic volumes, instead of dynamic volumes, on computers running MS-DOS, Windows 95, Windows 98, Windows ME Edition, Windows NT 4.0, or Windows XP Home Edition that are configured to dual-boot with Windows XP Professional or Windows Server 2003 operating systems.
  • Click –> start –> Computer –> Right click   Manage –> Computer Management   Window Open it.
  • Click  -> Disk Management .
  • disk1
  • How to manage Disk Volumes;
  • Disk Management allows you to change disks between various types and partition styles, some of the operations are irreversible (unless you reformat the drive).
  • You should carefully consider the disk type and partition style that is most appropriate for your application.
  • Master Boot Record (MBR) Can be converted in to GPT (GUID) Partition Table .if there are no volumes on it.
  • MBR can be converted in to Dynamic but the disk may Become unbootable.
  • GPT can be converted in to MBR if there are no volumes on it.
  • GPT can be converted in to Dynamic but the disk may Become unbootable
  • Dynamic can be converted in to MBR if there are no volumes on it.
  • Basic Disk : Manage all the Partition on the  Disk. All the disk are initially  Basic disk.
  • It is Supported By DOS And All Windows Versions.
  • Primary Partitions : There Can be only four Partitions On any Hard Disk.
  • In the case of MBR basic Disk  first  three Simple volumes  are Created  on  Primary Partitions  and  fourth  simple volume is  Created  as Extended partition ,Within the extended partition, you can create unlimited logical drives.
  • d1
  • Extended Partition : There  can be only  a single extended partition  on Any Disk.but it can be divided in to the multiple Logical Drives. A non bootable Portion Of the Hard disk.
  • d5
  • Logical Partition : Partition Of a hard Disk that acts as a single unit .All logical Partition are contained in Extended Partition
  • d4
  • Simple partition creation
  • :Start –> Computer -> Right Click –>Manage –> Click –> Computer Management .->Left pane –> Disk Management.
  • Right Click the unallocated  volume and Choose New  Simple Volume.
  • simple volume
  • New Simple Volume Wizard open it.
  • simplewindow
  • Click –>Next Specify Volume size Click Next
  • image
  • Assign Drive Letter and Paths and Click –> Next
  • savesimple2
  • Format the Partition and Click Next.
    • s3
    • completing the Wizard Click Finish.
    • finish

  • How to Shrink a Volume :
  • Start –> Computer -> Right Click –>Manage –> Click –> Computer Management .->Left pane –> Disk Management.
  • Right Click the  Volume  and Choose Shrink volume .The shrink Dialog box Appear.
  • d11
  • Right Click on the unallocated Space and then click Next
  • d12
  • Assign Drive Letter and Path click Next
  • savesimple2
  • Format the Partition and Click Next.
  • s3
  • completing the Wizard Click Finish.
  • finish
  • How to Extended a Volume :
  • Start –> Computer -> Right Click –>Manage –> Click –> Computer Management .->Left pane –> Disk Management.
    • ext1
    • Right Click the  Volume  and Choose Extend volume .The Extend Dialog box Appear.
    • disk6
    • Click  Next –> Extend Volume Wizard dialog Box open Click –>Finish
    • ext2
    • Dynamic Disk: Dynamic disk introduced in Windows Server 2000 . Dynamic disk do not  use  a partition table  to track  all partitions but use  a hidden database to  track information about dynamic Partitions on the Disk.
    • Dynamic disk also supported in Windows 7. You can create volumes such as spanned  and striped volumes  and can also create fault-tolerant such as mirrored volume  and RAID5 volume
    • After the Conversion of a basic disk in to Dynamic disk all the existing partitions and logical partitions of the basic disk become simple volumes on the basic disk.
    • Do not convert disks to dynamic that contain multiple installations of Windows 2000, Windows XP Professional, or the Windows Server 2003 family of operating systems. It is likely that you will no longer be able to start the second installation.
    • After you convert a basic disk into a dynamic disk, you cannot change the dynamic volumes back to partitions. Instead, you must move or back up your data, delete all dynamic volumes on the disk and then convert the disk.
    • Dynamic disks are not supported on portable computers, removable disks, detachable disks that use Universal Serial Bus (USB) or IEEE 1394 (also called FireWire) interfaces, or on disks connected to shared SCSI buses.
    • To convert  a Basic Disk In to  Dynamic  disk :
    • Right click On the Basic disk  Click convert to Dynamic Disk
    • d7
    • Boot and system partitions.You can convert a basic disk containing the boot partition (which contains the operating system) to a dynamic disk. After the disk is converted, the boot partition becomes a simple boot volume (after restarting the computer).
    • Dynamic disks provide features that basic disks do not, such as the ability to create volumes that span multiple disks (spanned and striped volumes), and the ability to create fault tolerant volumes (mirrored and RAID-5 volumes). All volumes on dynamic disks are known as dynamic volumes.
    • dynamic
    • Windows 7 allows you to  create  different disk volumes on   Dynamic Disks.
    • Simple Volume
    • Spanned Volume
    • Mirrored Volume
    • Striped Volume
    • Striped Volume With parity
    • Simple and Spanned volumes possible to shrink and Extend .
    • Striped volume are fixed in size  so only option to delete it  and  recreate it.

General Keyboard Shortcuts For Windows

The General Shortcuts

  • [CTRL KEY + C ] ->  Copy.
  • [CTRL KEY + X ] ->  Cut.
  • [CTRL KEY + V ] ->  Paste.
  • [CTRL KEY + Z ] ->  Undo.
  • [DELETE]->  Delete.
  •  [SHIFT KEY + DELETE ] ->  Delete the selected item permanently without placing the item in the Recycle Bin.
  •  [CTRL KEY while dragging an item ] ->  Copy the selected item.
  •  [CTRL KEY + SHIFT KEY while dragging an item ] ->  Create a shortcut to the selected item.
  •  [F2 KEY] ->  Rename the selected item.
  • [CTRL KEY  +  RIGHT ARROW KEY ] ->  Move the insertion point to the beginning of the next word.
  • [CTRL KEY  +  LEFT ARROW KEY ] ->  Move the insertion point to the beginning of the previous word.
  •  [CTRL KEY  +  DOWN ARROW KEY ] ->  Move the insertion point to the beginning of the next paragraph.
  •  [CTRL KEY  +  UP ARROW KEY ] ->  Move the insertion point to the beginning of the previous paragraph.
  •  [CTRL KEY  +  SHIFT KEY with any of the arrow keys] ->  Highlight a block of text.
  •  [SHIFT KEY + Any of the ARROW KEY ] ->  Select more than one item in a window or on the desktop, or select text in a document.
  • [CTRL KEY  +  A ] ->  Select all.
  • [F3 key] ->  Search for a file or a folder.
  • [ALT  +  ENTER ] ->  View the properties for the selected item.
  •  [ALT  +  F4 ] ->  Close the active item, or quit the active program.
  •  [ALT  +  ENTER ] ->  Display the properties of the selected object.
  •  [ALT  +  SPACEBAR ] ->  Open the shortcut menu for the active window.
  •  [CTRL KEY  +  F4 ] ->  Close the active document in programs that enable you to have multiple documents open simultaneously.
  •  [ALT  +  TAB ] ->  Switch between the open items.
  • [ALT  +  ESC ] ->  Cycle through items in the order that they had been opened.
  •  [F6 key ] ->  Cycle through the screen elements in a window or on the desktop.
  •  [F4 key ] ->  Display the Address bar list in My Computer or Windows Explorer.
  • [SHIFT KEY  +  F10 ] ->  Display the shortcut menu for the selected item.
  • [ALT  +  SPACEBAR ] ->  Display the System menu for the active window.
  • [CTRL KEY  +  ESC ] ->  Display the Start menu.
  • [ALT  +  Underlined letter in a menu name ] ->  Display the corresponding menu.
  •  [F10 key ] ->  Activate the menu bar in the active program.
  • [RIGHT ARROW KEY ] ->  Open the next menu to the right, or open a submenu.
  •  [LEFT ARROW KEY ] ->  Open the next menu to the left, or close a submenu.
  • [F5 key ] ->  Update the active window.
  • [BACKSPACE ] ->  View the folder one level up in My Computer or Windows Explorer.
  • [ESC ] ->  Cancel the current task.
  • [SHIFT KEY][ when you insert a CD-ROM into the CD-ROM drive ] ->  Prevent the CD-ROM from automatically playing.
  • Dialog Box Keyboard Shortcuts
  •  [CTRL KEY  +  TAB ] ->  Move forward through the tabs.
  • [CTRL KEY  +  SHIFT KEY  +  TAB ] ->  Move backward through the tabs.
  • [TAB ] ->  Move forward through the options.
  •  [SHIFT KEY  +  TAB ] ->  Move backward through the options.
  • [ALT  +  Underlined letter ] ->  Perform the corresponding command or select the corresponding option.
  •  [ENTER ] ->  Perform the command for the active option or button.
  •  [SPACEBAR ] ->  Select or clear the check box if the active option is a check box.
  • [ARROW KEY keys ] ->  Select a button if the active option is a group of option buttons.
  • [F1 key ] ->  Display Help.
  •  [F4 key ] ->  Display the items in the active list.
  • [BACKSPACE ] ->  Open a folder one level up if a folder is selected in the Save As or Open dialog box.
  • Microsoft Natural Keyboard Shortcuts
  • [Windows KEY ] ->  Display or hide the Start menu.
  •  [Windows KEY  +  BREAK ] ->  Display the System Properties dialog box.
  •  [Windows KEY  +  D ] ->  Display the desktop.
  • [Windows KEY  +  M ] ->  Minimize all of the windows.
  •  [Windows KEY  +  SHIFT KEY  +  M ] ->  Restore the minimized windows.
  • [Windows KEY  +  E ] –>  Open My Computer.
  • [Windows KEY  +  F ] ->  Search for a file or a folder.
  • [CTRL KEY  +  Windows KEY  +  F ] ->  Search for computers.
  • [Windows KEY  +  F1 ] ->  Display Windows Help.
  •  [Windows KEY  +   L ] ->  Lock the keyboard.
  •  [Windows KEY  +  R ] ->  Open the Run dialog box.
  • [windows KEY  +  U ] ->  Open Utility Manager.
  • Accessibility Keyboard Shortcuts
  • [Right SHIFT KEY for eight seconds ] ->  Switch Filter Keys either on or off.
  • [Left ALT  +  left SHIFT KEY  +  PRINT SCREEN ] ->  Switch High Contrast either on or off.
  • [Left ALT  +  left SHIFT KEY  +  NUM LOCK ] ->  Switch the MouseKeys either on or off.
  • [SHIFT KEY five times ] ->  Switch the Sticky Keys either on or off.
  • [NUM LOCK for five seconds ] ->  Switch the ToggleKeys either on or off.
  •  [Windows KEY   +  U ] ->  Open Utility Manager.
  • Windows Explorer Keyboard Shortcuts
  •  [END ] ->  Display the bottom of the active window.
  • [HOME ] ->  Display the top of the active window.
  •  [NUM LOCK  +  * KEY ] -> Display all of the subfolders that are under the selected folder.
  • [NUM LOCK  +  Plus sign ] -> Display the contents of the selected folder.
  •  [NUM LOCK  +  Minus sign ] -> Collapse the selected folder.
  • [LEFT ARROW KEY ] -> Collapse the current selection if it is expanded, or select the parent folder.
  • [RIGHT ARROW KEY ] -> Display the current selection if it is collapsed, or select the first subfolder.
  • Shortcut Keys for Character Map
  • After you double-click a character on the grid of characters, you can move through the grid by using the keyboard shortcuts:
  •  [RIGHT ARROW KEY ] ->  Move to the right or to the beginning of the next line.
  • [LEFT ARROW KEY ] ->  Move to the left or to the end of the previous line.
  •  [UP ARROW KEY ] ->  Move up one row.
  •  [DOWN ARROW KEY ] ->  Move down one row.
  • [PAGE UP ] ->  Move up one screen at a time.
  • [PAGE DOWN ] ->  Move down one screen at a time.
  • [HOME ] ->  Move to the beginning of the line.
  •  [END ] ->  Move to the end of the line.
  •  [CTRL KEY  +  HOME ] ->  Move to the first character.
  • [CTRL KEY  +  END ] ->  Move to the last character.
  • [SPACEBAR ] ->  Switch between Enlarged and Nor mal mode when a character is selected.
  • Microsoft Management Console ] ->  MMC) Main Window Keyboard Shortcuts
  • [CTRL KEY  +  O ] ->  Open a saved console.
  • [CTRL KEY  +  N ] ->  Open a new console.
  • [CTRL KEY  +  S ] ->  Save the open console.
  • [CTRL KEY  +  M ] ->  Add or remove a console item.
  • [CTRL KEY  +  W ] ->  Open a new window.
  • [F5 key] ->  Update the content of all console windows.
  • [ALT  +  SPACEBAR ] ->  Display the MMC window menu.
  •  [ALT  +  F4 ] ->  Close the console.
  • [ALT  +  A ] ->  Display the Action menu.
  • [ALT  +  V ] ->  Display the View menu.
  •  [ALT  +  F ] ->  Display the File menu.
  • [ALT  +  O ] ->  Display the Favorites menu.
  • MMC Console Window Keyboard Shortcuts
  • [CTRL KEY  +  P ] ->  Print the current page or active pane.
  • [ALT  +  Minus sign ] ->    Display the window menu for the active console window.
  • [SHIFT KEY  +  F10 ] ->  Display the Action shortcut menu for the selected item.
  • [F1 key] ->  Open the Help topic, if any, for the selected item.
  • [F5 key] ->  Update the content of all console windows.
  •  [CTRL KEY  +  F10 ] ->  Maximize the active console window.
  • [CTRL KEY  +  F5 ] ->  Restore the active console window.
  • [ALT  +  ENTER ] ->  Display the Properties dialog box, if any, for the selected item.
  • [F2 key ] ->  Rename the selected item.
  • [CTRL KEY  +  F4 ] ->  Close the active console window. When a console has only one console window, this shortcut closes the console.
  • Remote Desktop Connection Navigation
  • [CTRL KEY  +  [ALT  +  END ] ->  Open the Microsoft Windows NT Security dialog box.
  • [ALT  +  PAGE UP ] ->  Switch between programs from left to right.
  • [ALT  +  PAGE DOWN ] ->  Switch between programs from right to left.
  •  [ALT  +  INSERT ] ->  Cycle through the programs in most recently used order.
  • [ALT  +  HOME ] ->  Display the Start menu.
  • [CTRL KEY  +  ALT  +  BREAK ] ->  Switch the client computer between a window and a full screen.
  • [ALT  +  DELETE ] ->  Display the Windows menu.
  • [CTRL KEY  +  ALT  +  Minus sign ] ->  Place a snapshot of the active window in the client on the Terminal server clipboard and provide the same functionality as pressing PRINT SCREEN on a local Computer
  • [CTRL KEY  +  ALT  +  Plus sign ] ->   Place a snapshot of the entire client window area on the Terminal server clipboard and provide the same functionality as pressing [ALT+PRINT SCREEN on a local computer.
  • Internet Explorer navigation
  •  [CTRL KEY  +  B ] ->  Open the Organize Favorites dialog box.
  •  [CTRL KEY  +  E ] ->  Open the Search bar.
  • [CTRL KEY  +  F ] ->  Start the Find utility.
  •  [CTRL KEY  +  H ] ->  Open the History bar.
  • [CTRL KEY  +  I ] ->  Open the Favorites bar.
  •  [CTRL KEY  +  L ] ->  Open the Open dialog box.
  • [CTRL KEY  +  N ] ->  Start another instance of the browser with the same Web address.
  • [CTRL KEY  +  O ] ->  Open the Open dialog box, the same as [CTRL KEY  +  L.]
  • [CTRL KEY  +  P ] ->  Open the Print dialog box.
  • [CTRL KEY  +  R ] ->  Update the current Web page.
  • [CTRL KEY  +  W ] ->  Close the current window.

Keyboard Tricks For Windows XP

  • [Windows]        –> Display or hide the Start menu.
  • [Windows] + [D] -> Show the desktop.
  • [Windows] + [E] –> Open My Computer
  • [Windows] + [F] –>   Search for a file or folder
  • [Windows] + [L] –>   Lock  the Desktop
  • [Windows] + [M] –>  Minimized all Windows
  • [Windows] + [R] –> Open the Run Dialog Box
  • [Windows] + [TAB] –> Switch Between Open Items.
  • [Windows] + [Break] –> Display the System Properties.
  • [CTRL ] –>   While dragging  Copy Selected Item
  • [CTRL]+[A ] –>   Select all
  • [CTRL]+[C ] –>   Copy
  • [CTRL]+[U ] –>   Underline
  • [CTRL]+[V ] –>   Paste
  • [CTRL]+[V ] –>   Paste
  • [CTRL]+[Z ] –>   Undo
  • [CTRL]+[X] –>   Cut
  • [CTRL]+[F4 ] –>   Close the Active Document’
  • [CTRL]+[Shift ] –> While dragging Create Shortcut to select  Item.
  • [CTRL]+[Right Arrow ] –>   Move the Insertion Point  to the beginning of Next Word.
  • [CTRL]+[Left Arrow  ] –>   Move the Insertion Point  to the beginning of Previous Word.
  • [CTRL]+[Down Arrow ] –>   Move the Insertion Point  to the beginning Next Paragraph
  • [CTRL]+[Up Arrow  ] –>   Move the Insertion Point  to the beginning of Previous Paragraph.
  • [CTRL]+[Esc] –>   Display the Start Menu
  • [Shift]+[CTRL]+[Esc] –>   Display Taskbar
  • [Esc] –>   Cancel the  Current Task.
  • [Shift]+[Delete] –>   Delete Selected Item Permanently without Placing the Item in the Recycle bin.
  • [Alt]+[Enter ] –>  View  Properties of the  Selected Item.
  • [Alt]+[F4 ]  –> Close the Active Item.
  • [Alt]+[Spacebar ]  –> Display the System menu for the  Active Window.
  • [Alt]+[Tab ]  –> Switch between the open items.
  • [F1] –>   Display  Help & Support.
  • [F2] –>   Rename Selected Item.
  • [F3] –>   Search For a File or Folder.
  • [F4] –>   Display  the Address bar list in my computer
  • [F5] –>   Refresh the Active Window.
  • [F6] –>   Display  Cycle through screen elements in a window or on the desktop.
  • [F10] –>  Activate the menu bar in the active program.

Run Commands For Windows

  • OSK: opens on-screen Keyboard
  • osk
  • Winver: opens  the  windows version
  • image
  • WMPLAYER :    opens Windows Media Player.
  • WMPLAYER
  • CALC: opens Calculator
  • cals
  • CMD: opens a command prompt
  • cmd
  • MSRA : Opens the Windows Remote Assistance
  • pic1
  • MSINFO32: Opens the System Information
  • syspic
  • DEVMGMT.MSC: opens Device Manager
  • HDWWIZ.CPL: opens Add hardware wizard .
  • Devmgmt.msc – Device manager.
  • devicem
  • Taskmgr : Opens the Windows Task Manager
  • taskm
  • Sigverif : Opens the tool for verification of signatures of files.
  • sigverif
  • MSDT: opens the diagnostic tools and support Microsoft.
  • msdiag
  • Compmgmt.msc – Computer management.
  • commanaget
  • Diskmgmt.msc – Disk management.
  • diskmgmt
  • eventvwr.msc – Event viewer
  • eventviewer
  • fsmgmt.msc – Shared folders.
  • sharedfolders
  • gpedit.msc – Local Group policies Editor
  • policteditor
  • lusrmgr.msc – Local users and groups.
  • localuser
  • perfmon.msc – Performance monitor.
  • performance
  • rsop.msc – Resultant set of policies.
  • rsop
  • secpol.msc – Local security settings
  • localsecuritypolicy
  • services.msc – Various Services
  • services
  • regedit – Registry Editor
  • reg
  • sysedit – System Configuration Editor
  • sysedit
  • msconfig – System Configuration Utility
  • sysconfig
  • win.ini _ windows loading information(also system.ini)
  • winini
    • DESK.CPL: opens display properties.Change the resolution.
    • desk
    •  APPWIZ.CPL: opens Control panel  Add or Remove programs utility tool .
    • appwizrd
    • timedate.cpl – Date/Time Properties Control
    • time
    • mmsys.cpl sounds- Sound Properties control
    • sound
    • sysdm.cpl : System Properties control
    • systemproperties

How to Make Unattended XP Installation CD

  • Create  a folder  deploy tools  on  the Hard disk  on the  any drive.
  • Insert a XP  Professional CD  in  the  CD ROM.
  • Right click on the XP  CD Drive  and locate  the  \support\tools\Deploy.cab  files on the Windows XP CD.
  • Copy and Paste this  folder in the  deploy tools folder previously  created  on the  Hard drive.
  • Now right click  on the it  and  extract  here .
  • Delete  all the  files  Except  Setupmgr.exe.
  • Double Click on Setupmgr.exe.
  • Click Next on Windows Setup Manager Wizard.
  • Select Create  a New Answer file  and click Next
  • xp1
  • Select Windows  Unattended installation  and click Next.
  • xp2
  • Select Windows XP Professional Edition  and Click Next
  • xp3
  • Select Fully  Automated and click Next
  • xp4
  • Select No option and click Next
  • xp5
  • Select I Accept The Terms Of The License Agreement, and click Next.
  • xp6
  • Type your name in the Name box and your organization in the Organization box, and click Next.
  • xp7
  • Leave the default settings on the Display Settings page, and click Next.
  • xp8
  • Select the appropriate time zone, and click Next.
  • xp9
  • Type the product key which you received with XP cd and Click Next
  • xp10
  • In the Computer Name text box, type a name for the computer, and click Add. Repeat this step to add additional computers to the installation and Click Next
  • xp11
  • Administrator Password In Answer File, and then click Next
  • image
  • Select Typical Settings and Click Next
  • x12
  • Select Workgroup and Click Next.
  • xp13
  • Leave default setting and Click Next
  • xp14
  • Leave default setting and Click Next
  • xp15
  • Leave default setting and Click Next
  • xp16
  • Leave default setting and Click Next
  • xp17
  • Leave default setting and Click Next
  • xp18
  • Leave default setting and Click Next
  • xp19
  • Leave default setting and Click Next
  • xp20
  • Click On Finish.
  • xp21
  • Save this files on the desired Location. and Click OK
  • xp23
  • Set Manager Complete  now close this  Window.
  • xp24
  • Create  a folder  XPCD   on  the Hard disk  on the  any drive.
  • Insert a XP  Professional CD  in  the  CD ROM.
  • Right click on the XP  CD Drive  and  Copy  all  files on XPCD folder  on the Hard Disk.
  • xp26
  • open  the unattended.txt and rename it with winnt.sif .
  • Copy the winnt.sif and past it in E:\xpcd\I386
  • xp25
  • Edit D:\deploy\winnt.bat with notepad to reflect the following changes. and save it.
  • 29
  • Download  the  Magic ISO Maker Tool. http://www.magiciso.com.
  • Run Magic ISO.
  • Insert the XP CD  in the CD  ROM OR  Mount  the XP  Original CD image .
  • Click menu “File”->”Open CD/DVD Driver”->CD Driver that contains Windows CD.
  • xp31
  • Click “i386” folder in left-up panel. Select “d:\deploy” in left-down panel.
  • Select both winnt.bat and winnt.sif . Click   to add both files into i386 folders of iso image.
  • xp30
  • Click to Save as ISO image.
  • Now burning this image into  any  Burning Software.
  • After burning, you will have an unattended installation CD.

Keyboard Tricks For Windows 8

  • [Windows]        –> Display or hide the Start menu.
  • [Windows] + [C] –> Open charms Menu.
  • [Windows] + [D] -> Show the desktop.
  • [Windows] + [E] –> Open My Computer
  • [Windows] + [F] –>   Search for a file or folder
  • [Windows] + [H] –> Charms Menu  Share.
  • [Windows] + [I] –> Charms Menu Settings
  • [Windows] + [K] –>  Charms Menu    Devices
  • [Windows] + [L] –>   Lock PC and go to lock screen
  • [Windows] + [M] –>  Minimized all Windows
  • [Windows] + [Q] –>  Search  for Installed Apps
  • [Windows] + [P] –> Choose Secondary  Display Modes
  • [Windows] + [R] –>  Open Run Dialog Box.
  • [Windows] + [T] –>  Cycle through  icons  on taskbar (Press  Enter to Launch Apps)
  • [Windows] + [U] –> Open Utility Manager.
  • [Windows] + [V] –> Cycle through  Notifications.
  • [Windows] + [W] –> Search Settings.
  • [Windows] + [X] –>  Show Advanced  Windows Settings Menu 
  • [Windows] + [Tab] –>  Cycle through open Modern UI Apps.
  •  [Windows] + [Tab]+[Shift] –> Cycle through open Modern UI Apps in reverse order.
  • [Windows] + [Home] –> Minimize all but selected window. Reverse by clicking the  key combination again.
  • [Windows] + Left Arrow  -> Maximize current window to Left side of the screen.
  • [Windows] +Right Arrow –> Maximize current window to Right side of the screen.
  • [Windows] + Up Arrow  -> Maximized selected window.
  • [Windows] + Down Arrow   ->Minimize selected window
  • [Windows] + [Spacebar] –> Switch input Language  and  Keyboard Layout
  • [Windows] + [Enter] –> Open  Narrator.
  • [Windows] + [+] –> Zoom  in magnifier
  • [Windows] + [-] –> Zoom  out magnifier
  • [Windows] + [Escape ] –> Exit  magnifier
  • [Windows] + [Print Screen] –> Take a Print Screen and saves to picture folder
  • [Windows] + [Pause- Break] –> Display System Properties.
  • [Windows] + [F1] –> Open Windows Help and Support
  • [CTR] + [Shift]+[Escape]–> Open Task Manager
  • [Alt] + [Enter] –> Display Properties of selected item in File Explorer
  • [Alt] + [Up Arrow] –> View upper level folder of current folder in File Explorer
  • [Alt] + Right Arrow] –> View next folder of current folder in File Explorer
  • [Alt] + [Left Arrow] –> View Previous of current folder in File Explorer
  • [Alt] + [Print Screen] –> Print Screen Focused  Windows Only

Reset your forgotten Administrator Password in the Windows XP

  • Place your Windows XP  bootable CD in your cd-rom and start your computer .boot from CD.
  • Press any key to boot from CD
  • first screen will indicate that Setup is inspecting your system and loading files.
  • When you get to the Welcome to Setup screen, press ENTER to Setup Windows now
  • The next screen is the Setup screen which gives you the option to do a Repair
  • The Licensing Agreement will come next – Press F8 to accept it .
  • The next screen is the Setup screen which gives you the option to do a Repair If one of the following Windows XP installations is damaged, Setup can try to repair it”
  • Use the up and down arrow keys to select your XP installation. and press R to begin the Repair process.
  • Let the Repair run. Setup will now check your disks and then start copying files which can take several minutes.
  • Shortly after the Copying Files stage, you will be required to reboot.Your computer will reboot in 15 seconds.
  • During the reboot, do not pressing any key to boot from the CD again.
  • Keep your eye on the lower left hand side of the screen and when you see the Installing Devices progress bar, press SHIFT + F10. This is the security hole! A command console will now open up giving you the potential for wide access to your system.
  • At the prompt, type NUSRMGR.CPL and press Enter.  You have just gained graphical access to your User Accounts in the Control Panel.
  • Now simply pick the account you need to change and remove or change your password as you wish. If you want to log on without having to enter your new password .
  • you can type control userpasswords2 at the prompt and choose to log on without being asked for a password..
  • exit the command box and continue on with the Repair .

Reset your forgotten Password in the Windows 7

Step 1:  Place the Windows 7 Installation disk into the optical drive and reboot your computer.

Step2:   Press  any key to boot  CD or DVD  .

Step3:  Click the ‘Repair your computer’ link located on the lower left corner of your screen.

win7

Step 3:  When the ‘System Recovery Options’ dialog screen pops up, select the ‘Command Prompt.

cmd

Step 4 :  Your next step will be to backup the original sticky keys file. When you see the ‘Command Prompt Window,’ type the following command, and hit ‘Enter

copy c:\windows\system32\sethc.exe c:\

Step 5:  Now, you need to overwrite the original sticky keys file (located in c:\windows\system32\) with the command prompt executable. To do this, type the following command and hit ‘Enter

copy c:\windows\system32\cmd.exe c:\windows\system32\sethc.exe

cmd2

to  confirm yes  and press enter.

Step 6:  Remove the Windows 7 installation disk from the optical drive and reboot your computer normally. When you see the login screen, press the ‘Shift’ key on your keyboard 5 times. This will launch an administrator mode command prompt.

Step 7:  Now it’s time to reset your password. All you have to do is type the following command and hit ‘Enter:

net user ‘username’ NewPassword

Step 8: Finally, you should restore the original sticky keys file.  To do this, repeat steps 1 – 3 and execute the following command:
c:\sethc.exe file back to c:\windows\system32\sethc.exe.

step 9: close the command prompt  and  reboot  the   computer  . Login  with  new user name and  password.

Installing windows 8.1 or Windows Server 2012 R2 in Oracle Virtual Box

When  the  release  new  OS  then first  check in the   virtualization  software  such as    virtual Box  or  VM   or   a   separate  partition   is  very  good  Idea. when  you  try to install the Windows Server 2012 R2 Preview  or  windows 8 .1  OS in Virtual Box, you get an error message “Your PC needs to restart” with the error code “0x000000C4 .

then  there  are   some  simple  steps  :

1. open  the  command  prompt  type 

2.”%program files%\oracle\virtualbox\vboxmanage.exe” setextradata “Image Name” VBoxInternal/CPUM/CMPXCHG16B  1

3.Replace “Image Name” text with the correct image name which you provided to the virtual machine name at the time of VM creation. It might be “Windows 8.1” or   windows  server 2012 anything else.

4. Now paste  the  command prompt  and  press  enter.

5.Now close the  command prompt .and windows try to start the virtual machine again now .

6.it  will work fine without any problem.